VitePress搭建
一、前言
首先,明确一点,不要轻易用最新的版本!!!
很多开源项目文档写的真的太简练了,五花八门的个人教程案例又太多,每个人都有自己的风格习惯,盲目到处搜索答案很容易适得其反
一般我们在遇到问题的时候解决方案一般有三:
- 去网上搜索,看别人写的博客
- 问gpt
- 问别人(效率最低,特别是对于不会提问的同学)
对开源项目来说,还有两条
- 去github的issues区看别人是否遇到过这种问题
- 自己提issue
为什么说不要用最新版本,首先版本发布的最新,很多问题网上根本没有解决方案,特别是对于比较小众的开源项目。
(当然自己足够强的话可以pull下来自己改bug)
其次问GPT的话它的知识库都没更新到最新,也没法解决。
至于github的issue区也只能碰运气。
二、环境配置
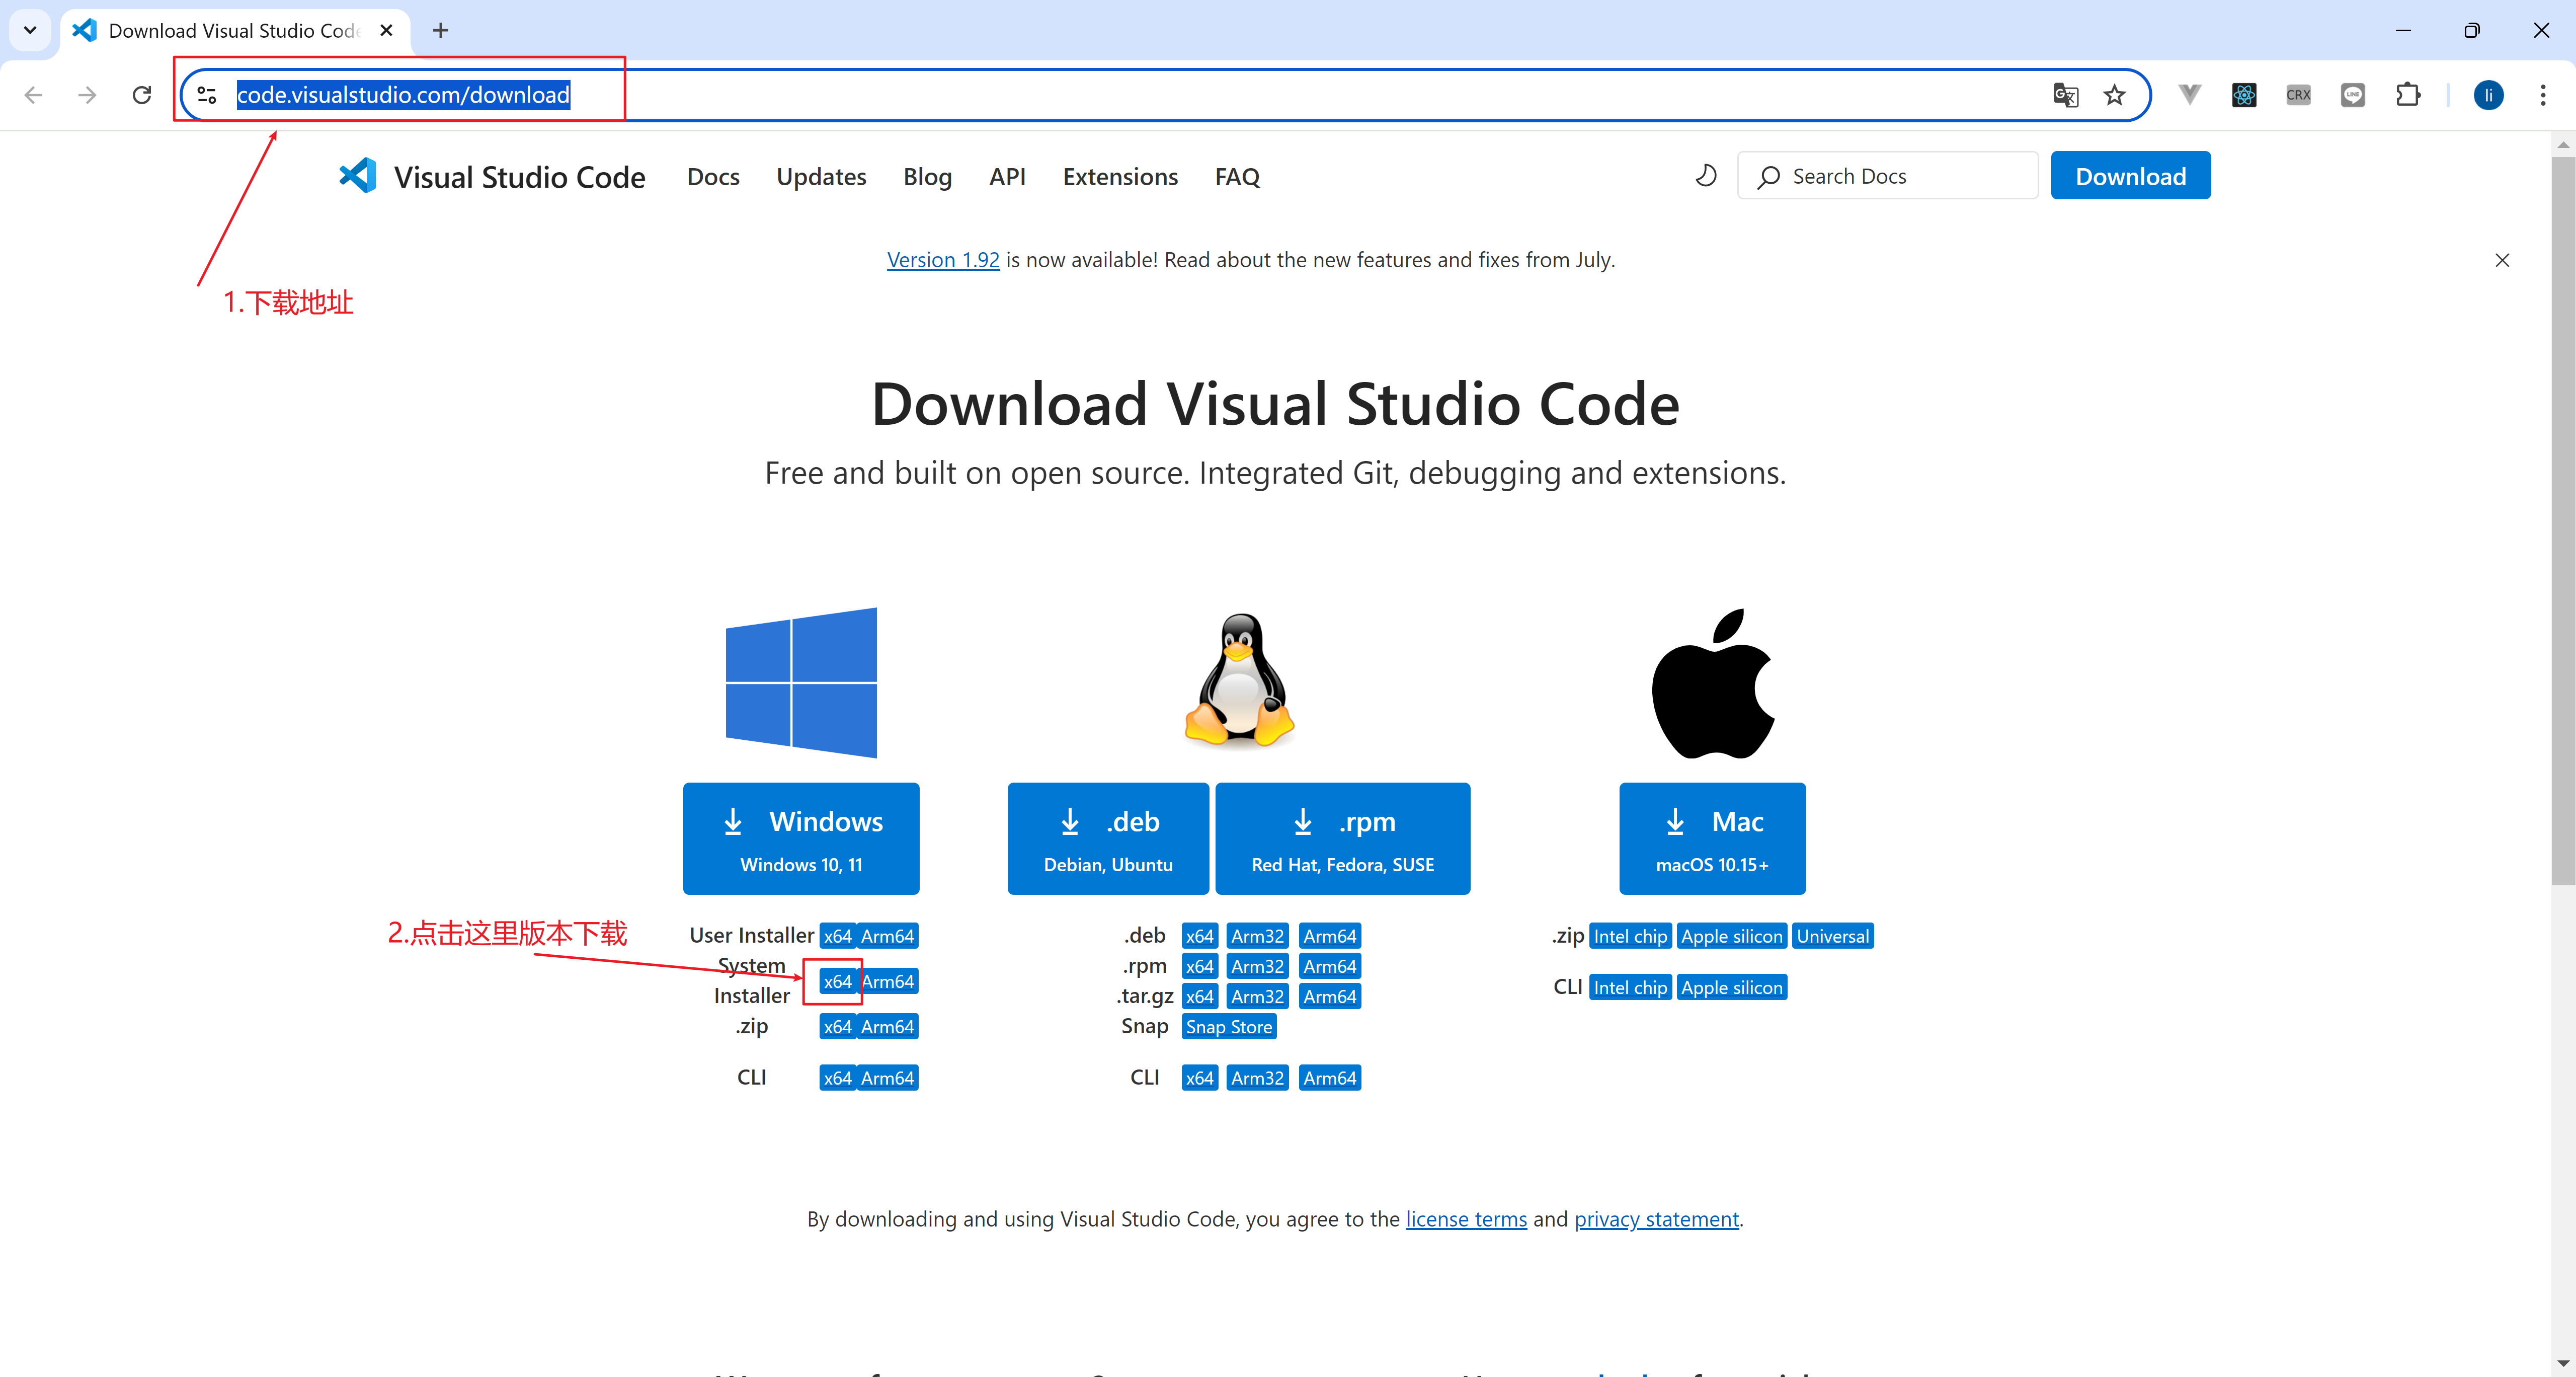
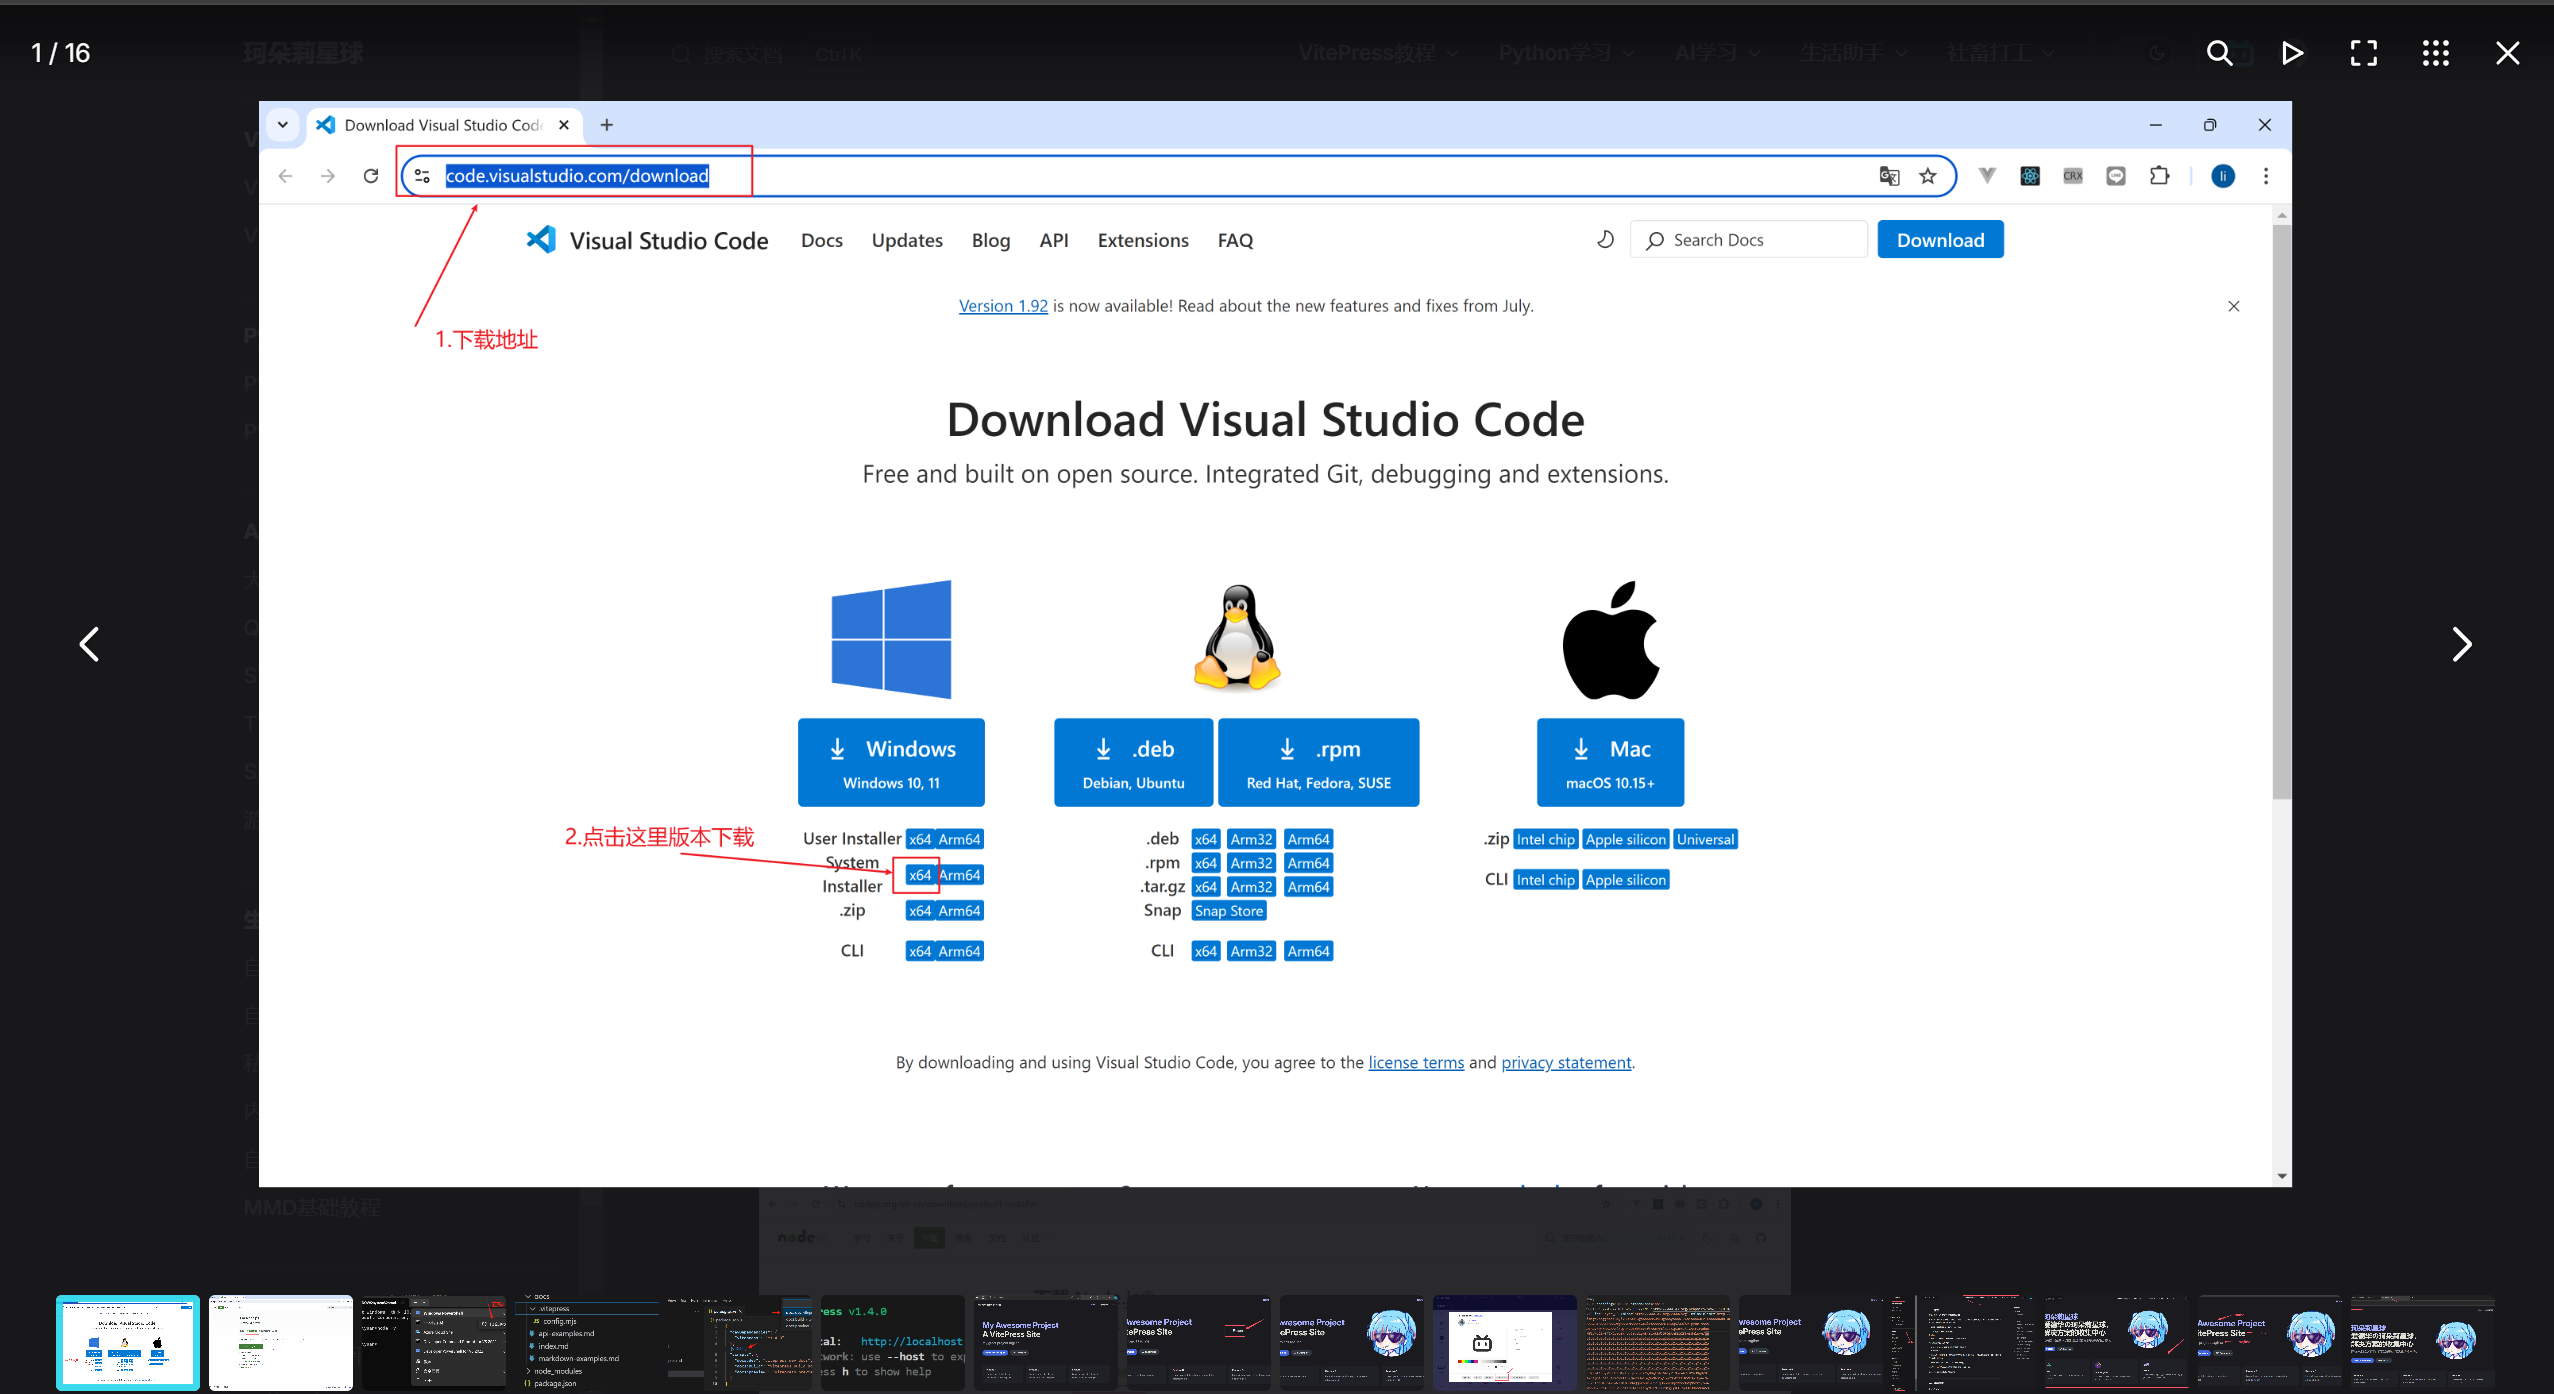
1. VSCode
官网:https://code.visualstudio.com/download
2. NodeJS
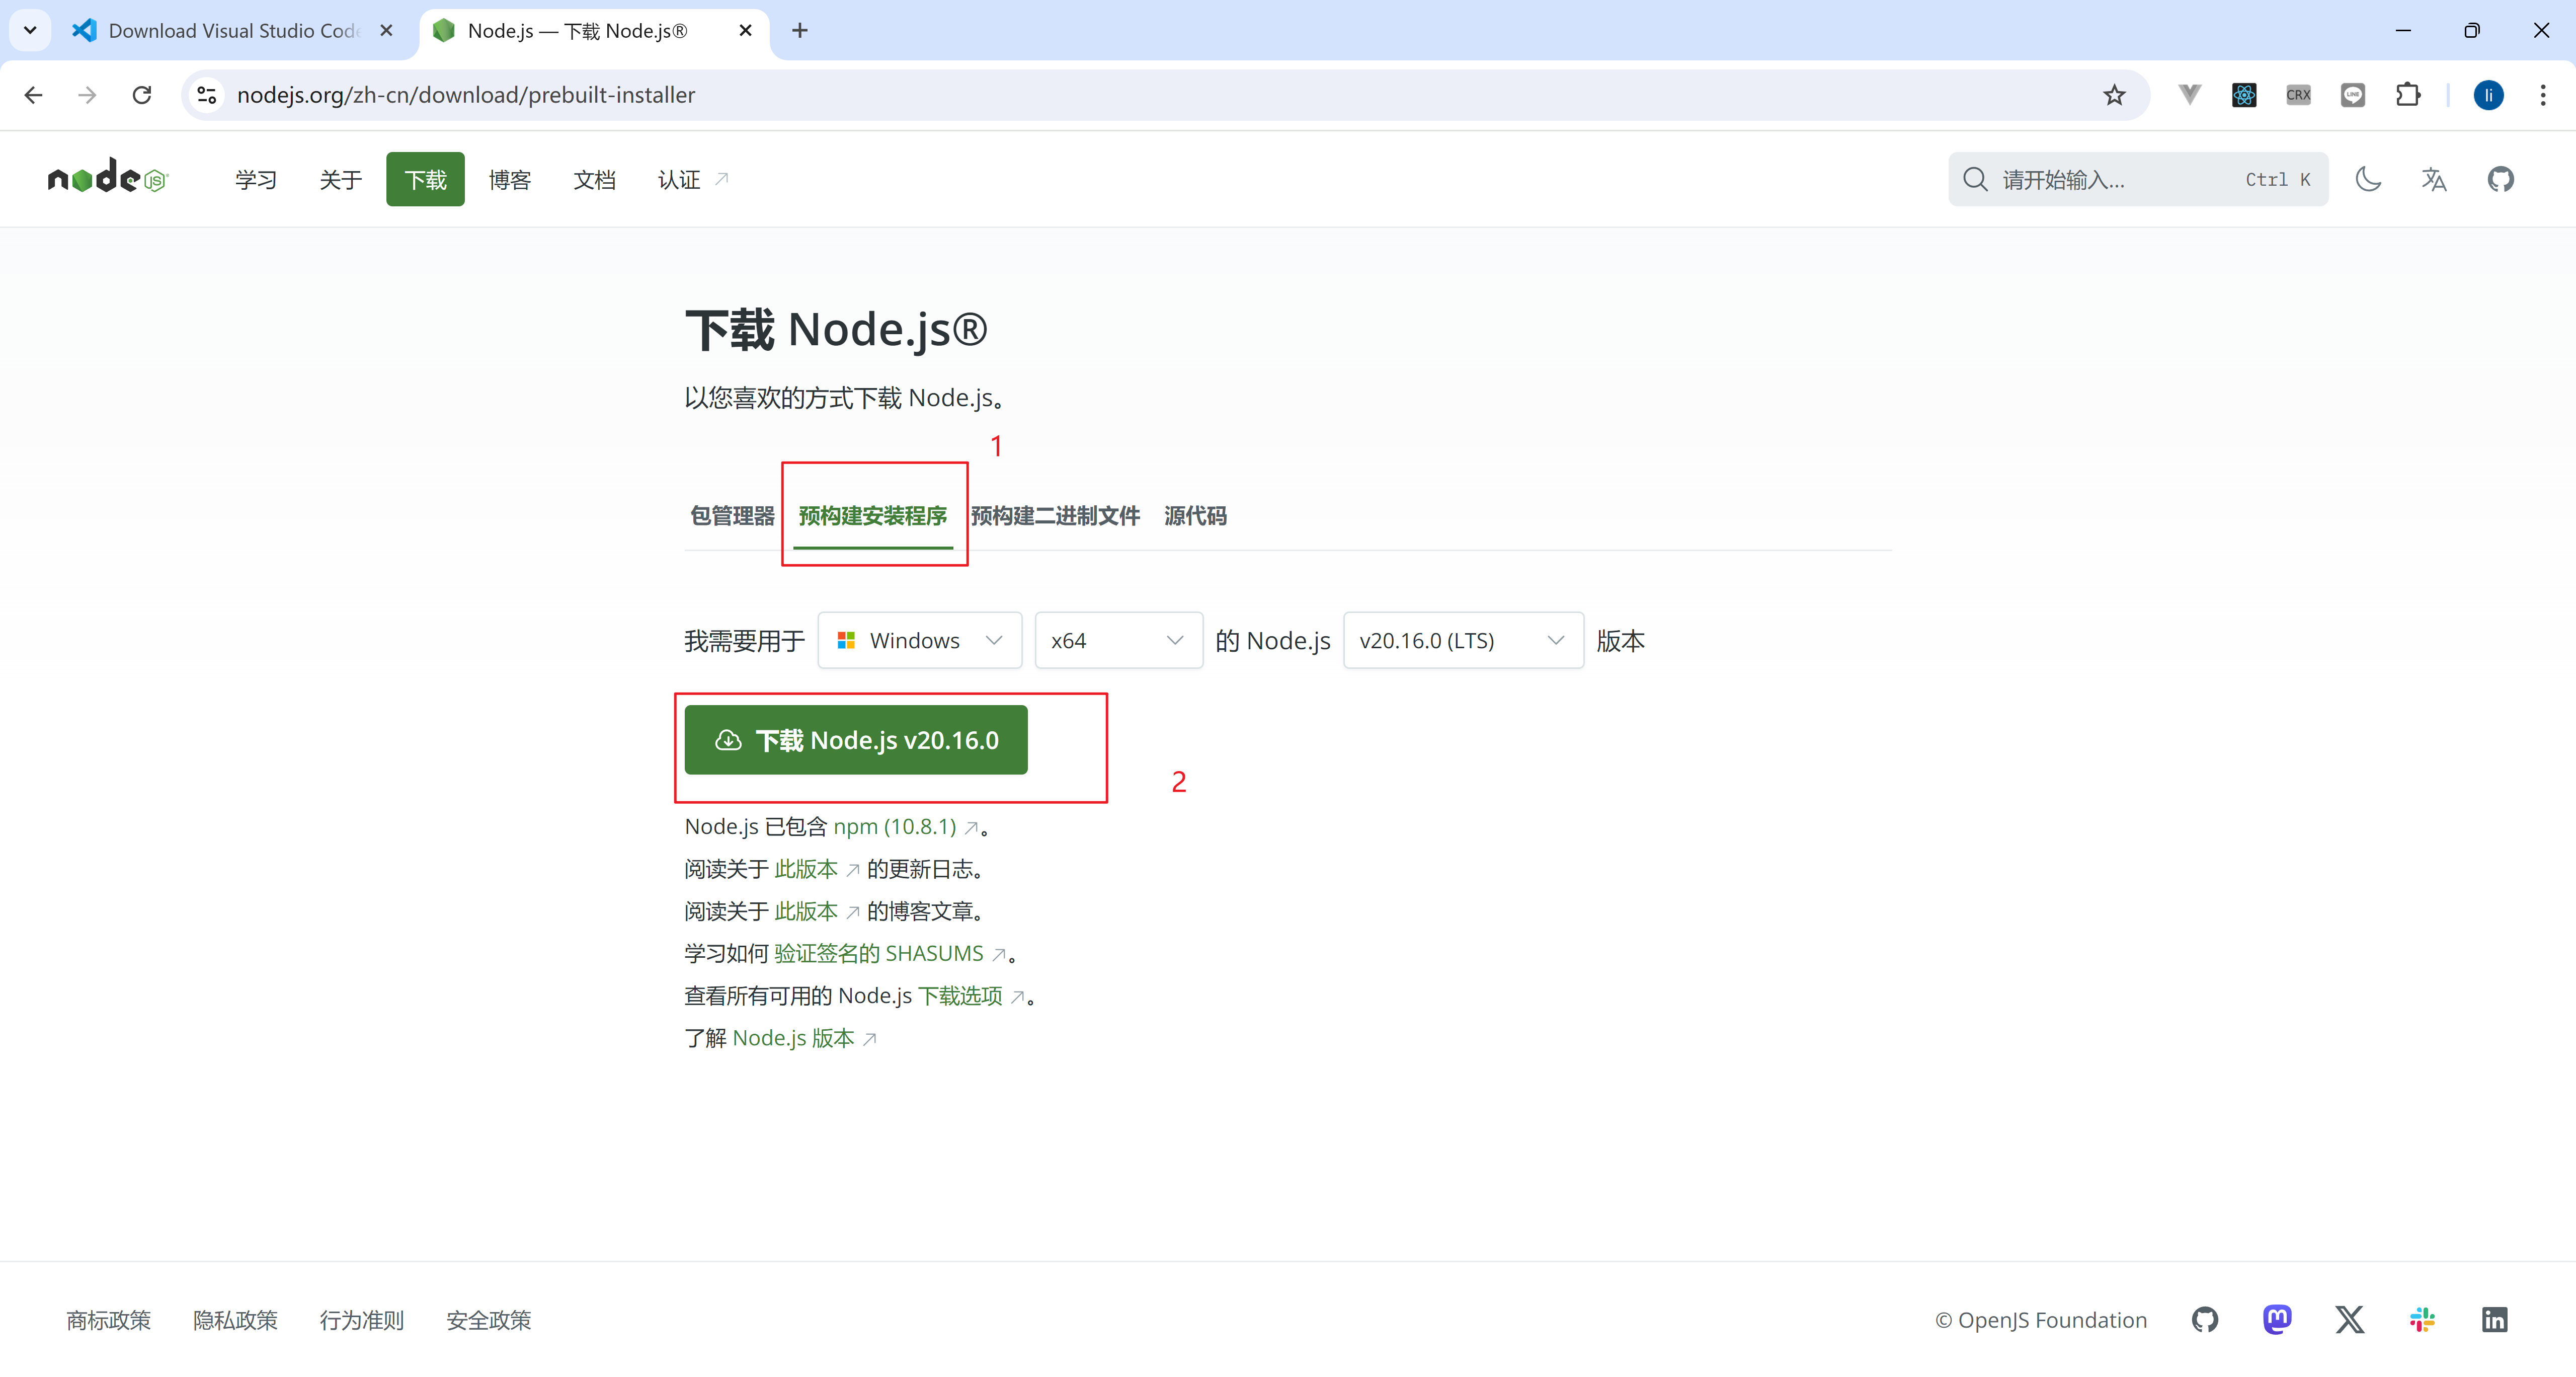
官网:https://nodejs.org/zh-cn/download/prebuilt-installer
TIP
如第一次安装,请记住你的node版本,本教程安装使用v20.18
如已安装,使用如下powershell/cmd命令查看当前版本
PS C:\Users\Administrator> node -v
v20.18.0
设置全局的 npm 镜像地址
PS C:\Users\Administrator> npm config set registry https://registry.npmmirror.com安装pnpm
PS C:\Users\Administrator> npm install -g pnpm
PS C:\Users\Administrator> pnpm -v
9.12.0
TIP
同样请记住你的pnpm版本,本教程安装使用9.12.0
3. 配置执行策略(Windows)
在 PowerShell 中,Get-ExecutionPolicy 命令用于获取当前的执行策略。PowerShell 的执行策略是一种安全功能,它控制脚本文件在系统上运行的条件。
打开 PowerShell,输入 Get-ExecutionPolicy 查看是否输出 Restricted
PS C:\Users\Administrator> Get-ExecutionPolicy
Restricted
用管理员方式打开 PowerShell,使用 Set-ExecutionPolicy 执行策略设置为 RemoteSigned
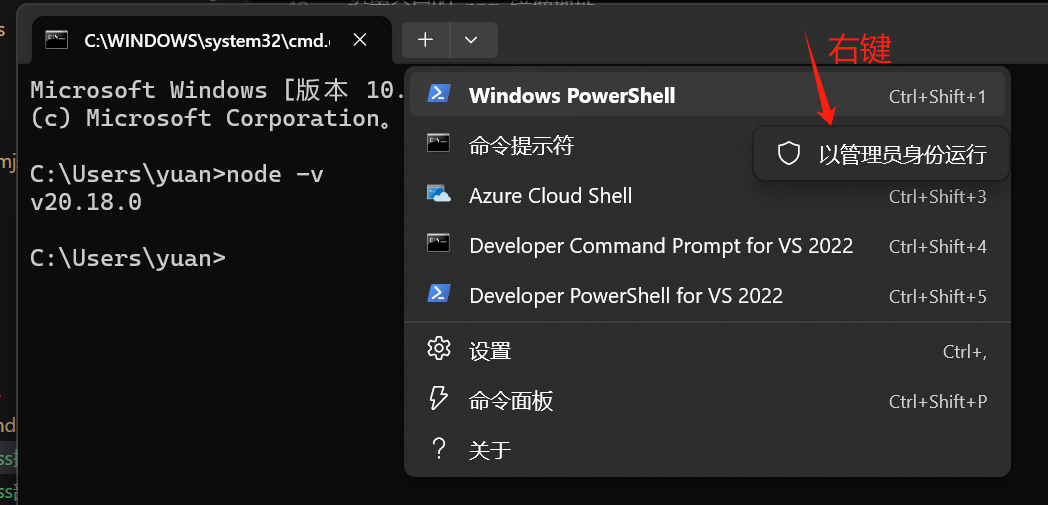
PS C:\Users\Administrator> Set-ExecutionPolicy RemoteSignedTIP
PowerShell Get-ExecutionPolicy 可能的返回值:
| 执行策略 | 描述 |
|---|---|
| Restricted | 默认设置,不允许任何脚本运行。只能执行单个命令。 |
| AllSigned | 只允许运行由可信发布者签名的脚本和配置文件。 |
| RemoteSigned | 允许运行本地脚本,但从互联网下载的脚本必须由可信发布者签名。 |
| Unrestricted | 允许所有脚本运行。下载的脚本在运行之前会提示用户是否愿意运行。 |
| Bypass | 完全绕过执行策略检查,允许所有脚本运行,不显示任何警告或提示。 |
| Undefined | 没有为当前作用域设置执行策略,默认执行策略为 Restricted。 |
注:原理上只有在返回 Restricted 时才需将执行策略设置为 RemoteSigned
当然也可以在返回其他值时也执行一次 Set-ExecutionPolicy RemoteSigned
4. 安装 Git
官网:https://git-scm.com/downloads
PS C:\Users\Administrator> git -v
git version 2.46.2.windows.1
三、VitePress 安装和初始化
1. 新建文件夹
使用powershell或者手动新建文件夹
PS D:\> mkdir -p vitepress2. 进入项目目录
TIP
PS D:\> cd vitepress注:路径为你上一步新建文件夹的名称路径
3. 安装及初始化VitePress
PS D:\vitepress> pnpm add -D vitepress
************
Done in 2.5s
PS D:\vitepress> pnpm vitepress init┌ Welcome to VitePress!
│
◇ Where should VitePress initialize the config?
│ ./docs
│
◇ Site title:
│ My Awesome Project
│
◇ Site description:
│ A VitePress Site
│
◇ Theme:
│ Default Theme
│
◇ Use TypeScript for config and theme files?
│ No
│
◇ Add VitePress npm scripts to package.json?
│ Yes
│
└ Done! Now run pnpm run docs:dev and start writing.TIP
配置选项说明
| 配置项 | 说明 |
|---|---|
| Where should VitePress initialize the config? | 项目生成路径,建议初次上手填写 docs |
| Site title: | 站点标题,后续可以在配置中修改 |
| Site description: | 站点描述,后续可以在配置中修改 |
| Theme: | 主题,新手建议选择第一个,个人觉得第二个比较好看 |
| Use TypeScript for config and theme files? | 是否使用ts,个人习惯js所以选的 No |
| Add VitePress npm scripts to package.json? | 是否添加脚本到package.json,这个是必须要的,启动命令,打包命令这些都得用 |
4. 打开VitePress项目
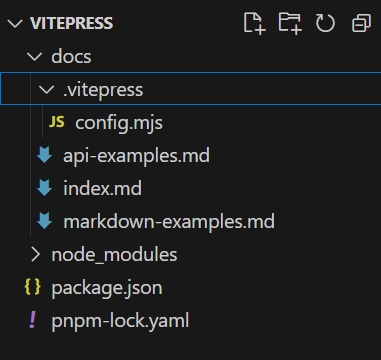
初始化成功后,使用vscode打开文件夹
- docs:初始化时的项目生成路径
- .vitepress:项目核心目录
- config.mjs:项目核心配置文件,各种配置导航栏、侧边栏、标题描述等都在这里
- node_modules:安装的nodejs依赖
- api-examples.md和markdown-examples.md:官方给的两个示例markdown文件
- index.md:项目主页
- package.json和pnpm-lock.yml:包管理工具需要用的
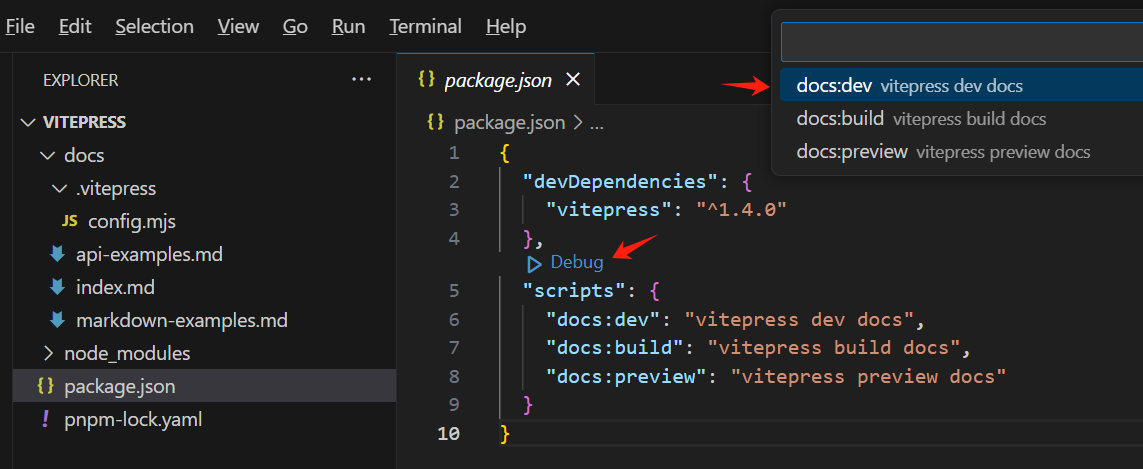
5. 启动VitePress项目
选中 package.json 灰色的Debug图标,选择 docs:dev
- docs:dev - 启动项目开发环境
- docs:build - 构建项目生产环境
- docs:preview - 启动构建后预览(伪生产环境)
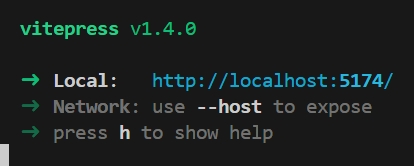
vscode的terminal中提示如下输出代表开发环境已启动,ctrl+click点击输出的loacl url地址
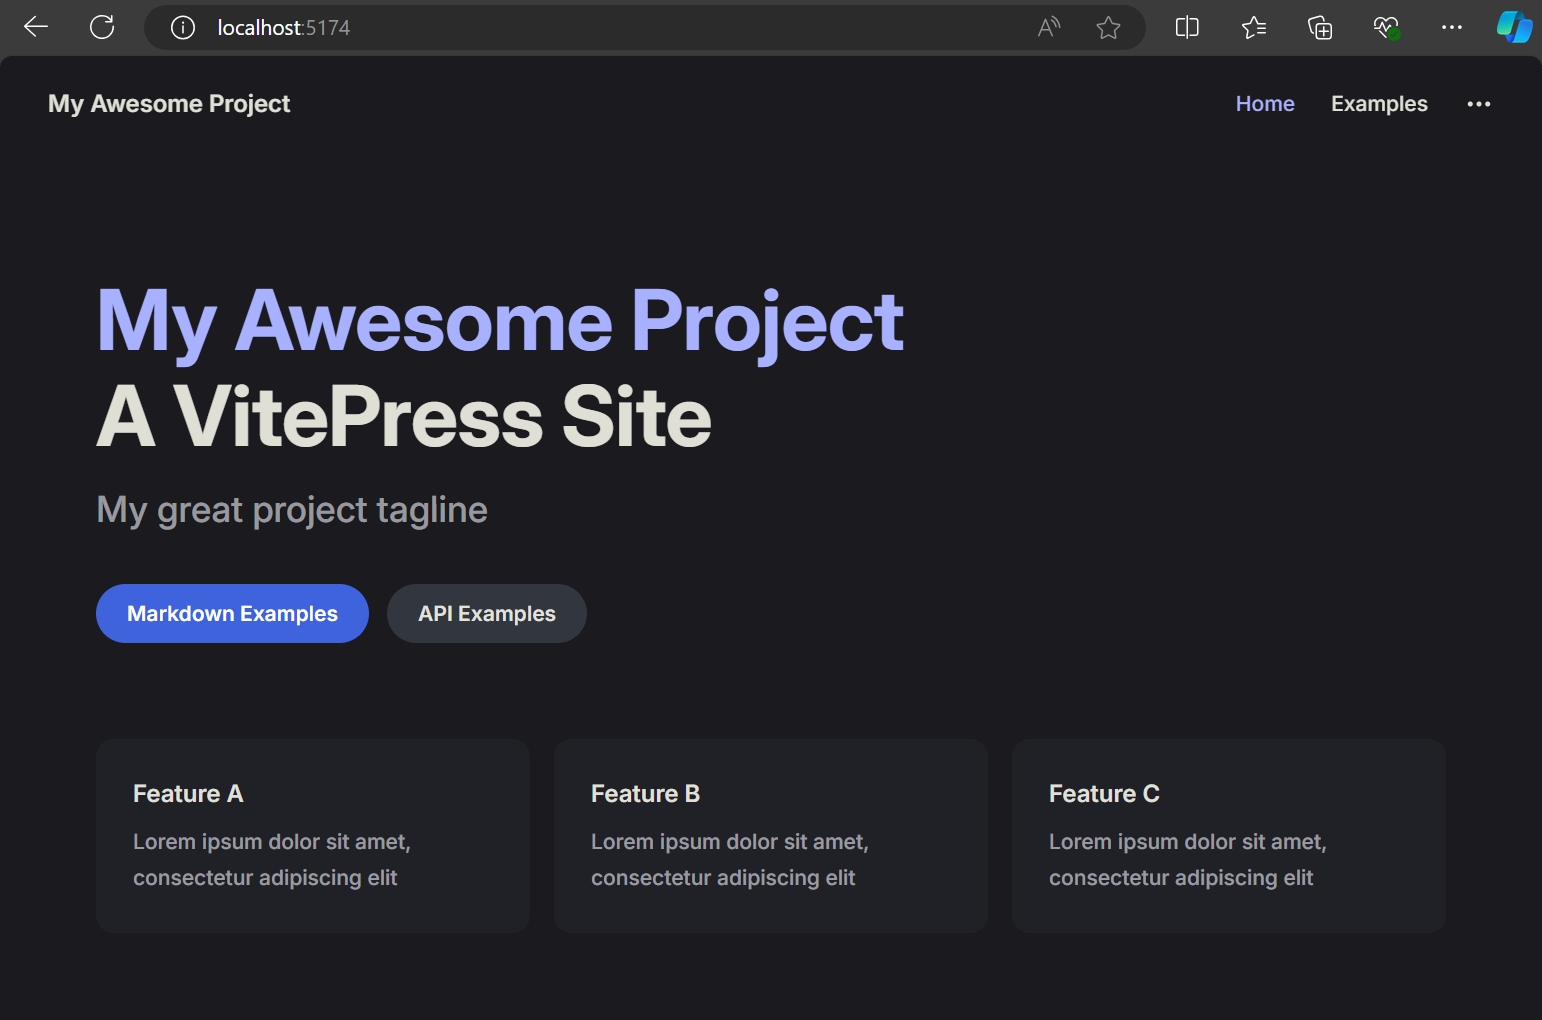
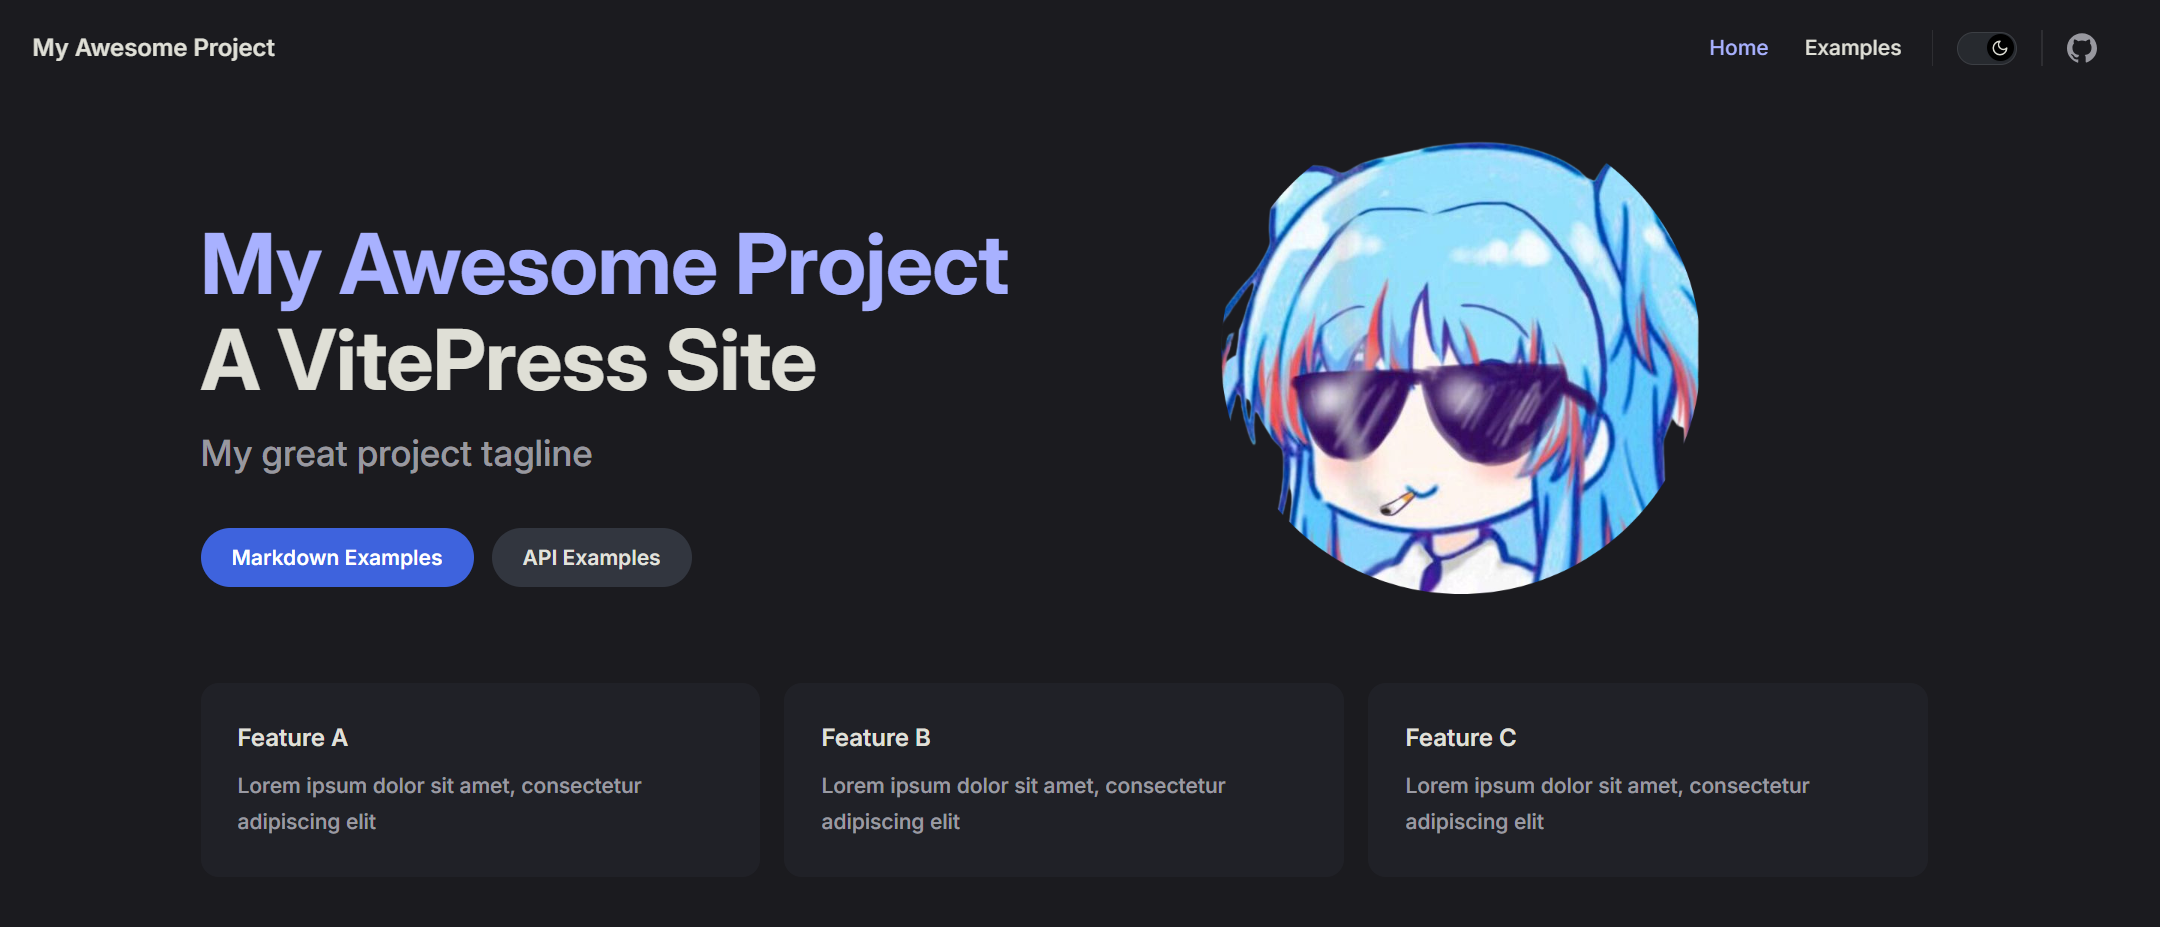
浏览器正常访问到如下页面代表VitePress开发环境启动成功
四、VitePress 主页优化
1. 首页图标优化
添加图标方式
阿里巴巴矢量图标库https://www.iconfont.cn/
在线图片转SVG网站,例https://onlineconvertfree.com/zh/convert-format/png-to-svg/
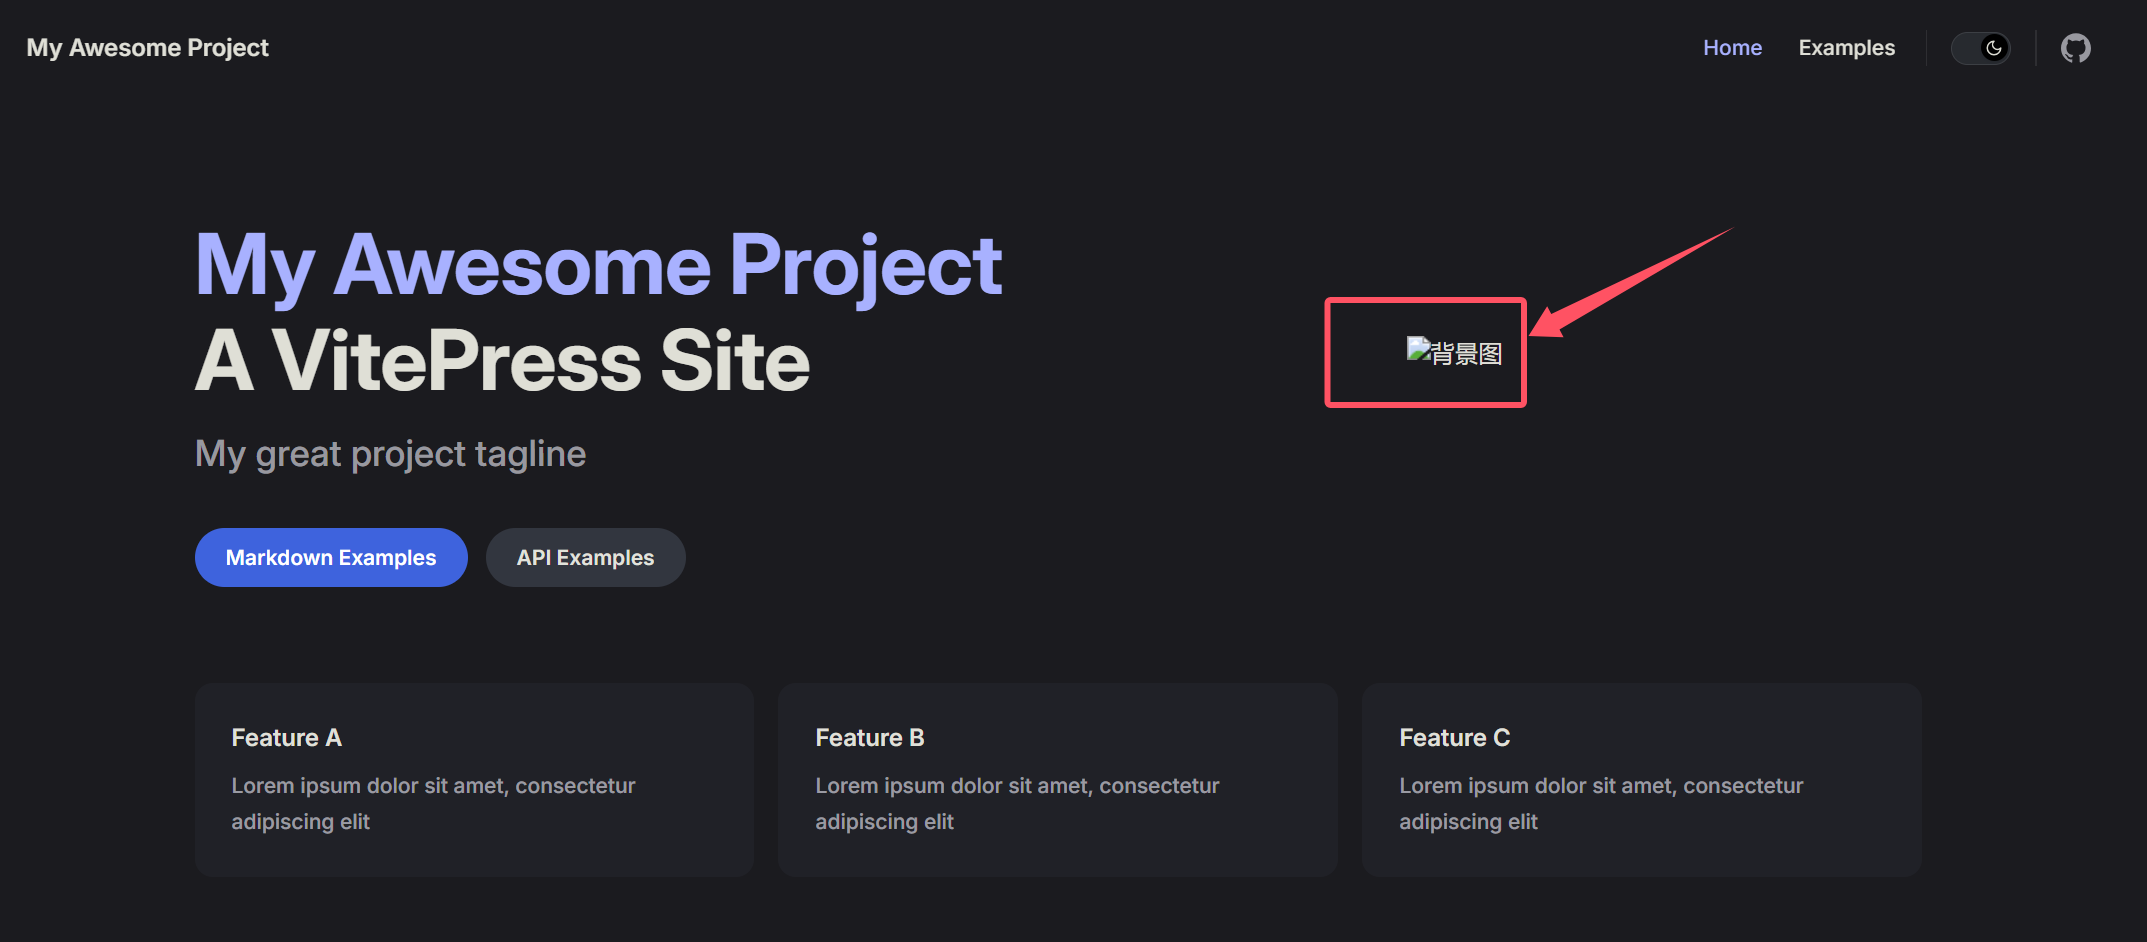
- 封面图标
打开 docs/index.md 文件,添加以下代码:
---
# https://vitepress.dev/reference/default-theme-home-page
layout: home

hero:
  name: "My Awesome Project"
  text: "A VitePress Site"
  tagline: My great project tagline
  image:
    src: /svg/kdl.svg
  actions:
    - theme: brand
      text: Markdown Examples
      link: /markdown-examples
    - theme: alt
      text: API Examples
      link: /api-examples

features:
  - title: Feature A
    details: Lorem ipsum dolor sit amet, consectetur adipiscing elit
  - title: Feature B
    details: Lorem ipsum dolor sit amet, consectetur adipiscing elit
  - title: Feature C
    details: Lorem ipsum dolor sit amet, consectetur adipiscing elit
---
TIP
引用的文件路由说明
在上述案例中,我们引用了 /svg/kdl.svg 但当我们使用 docs:build 命令构建后,再使用 docs:preview 命令进行预览时,会发生以下背景图丢失的情况:
- 解决方法: 由于vitepress路由设置的原因
浏览官方关于public 目录文档https://vitepress.dev/zh/guide/asset-handling#the-public-directory
可得知我们默认调用 /svg/kdl.svg 时,静态资源路由指向是默认调用 /docs/public/svg/kdl.svg
所以我们需要在 /docs/ 下创建一个public文件夹,将静态资源统一归集其中,重新构建并预览:
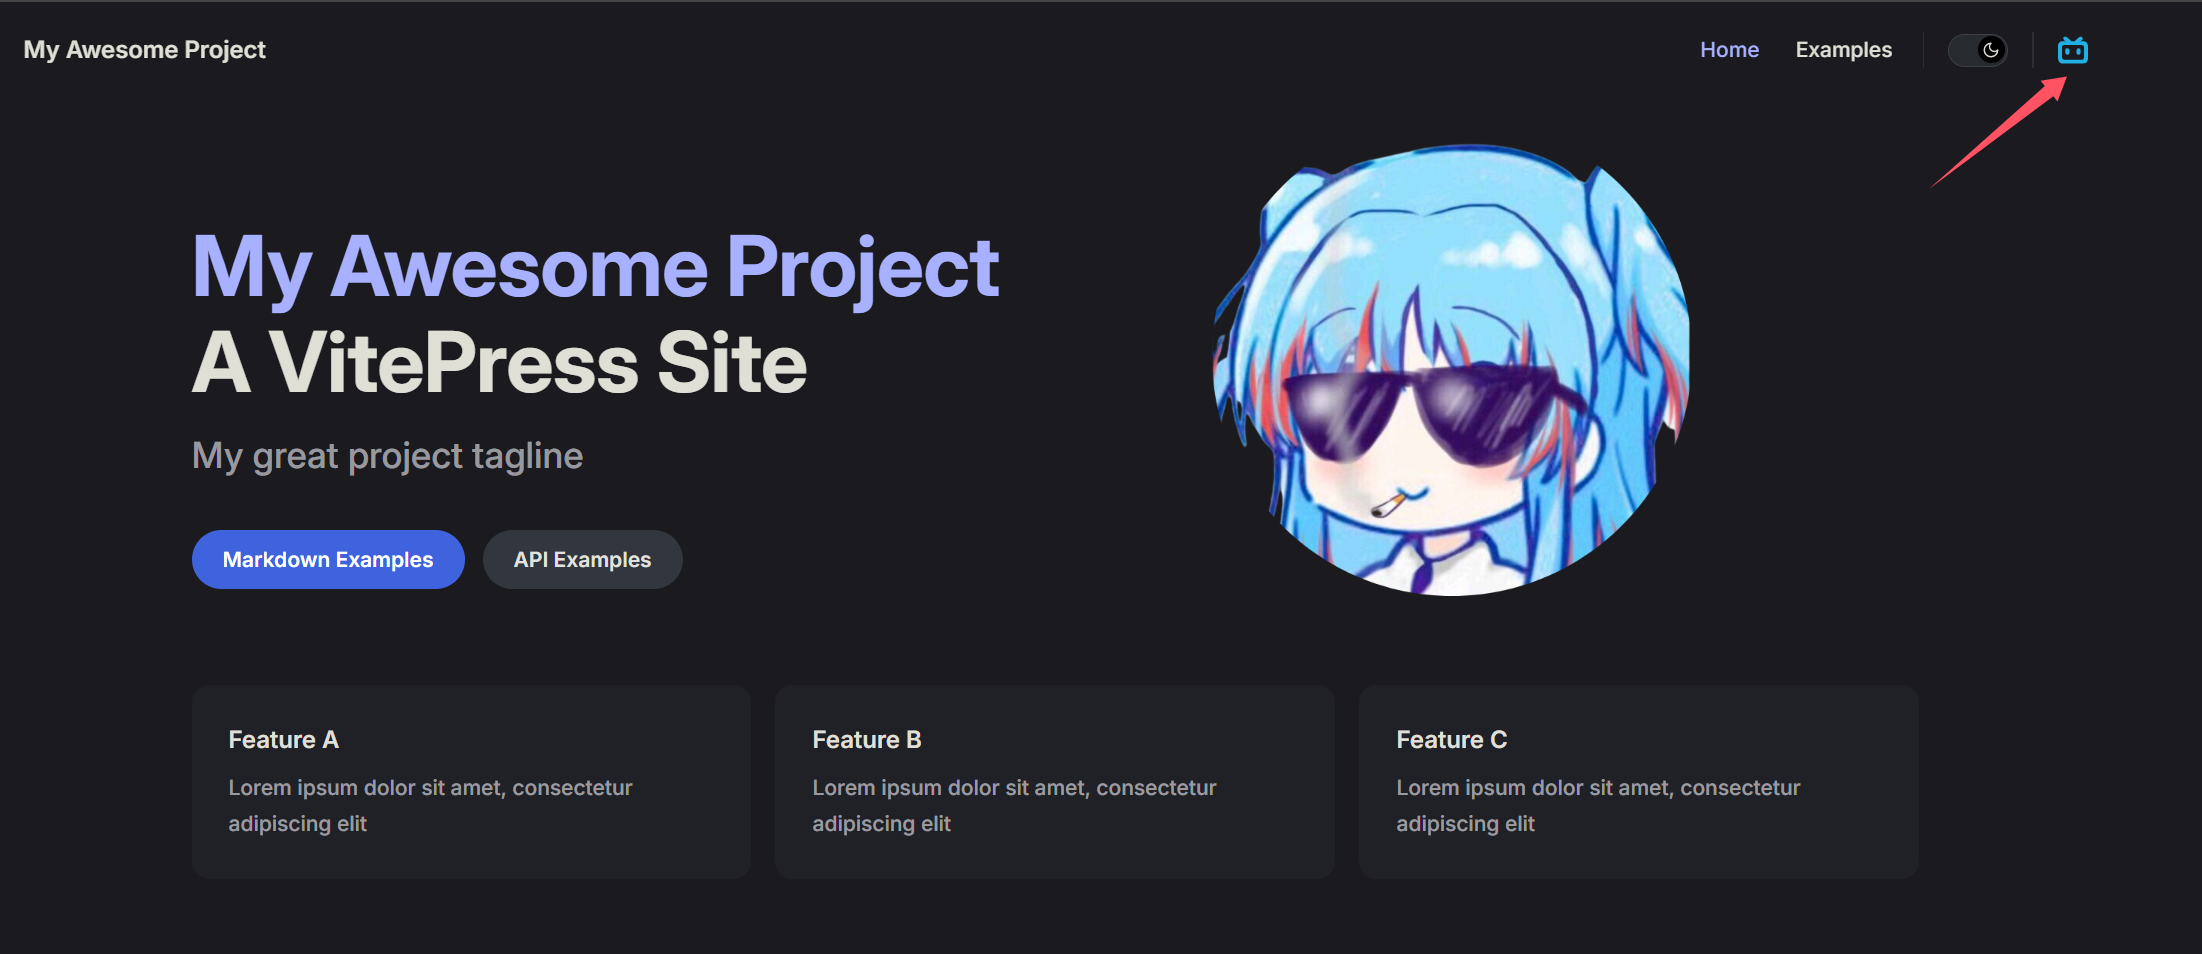
- 右上角socialLinks图标
打开 docs/.vitepress/config.mjs 文件,修改以下代码:
import { defineConfig } from 'vitepress'

// https://vitepress.dev/reference/site-config
export default defineConfig({
  title: "My Awesome Project",
  description: "A VitePress Site",
  themeConfig: {
    // https://vitepress.dev/reference/default-theme-config
    nav: [
      { text: 'Home', link: '/' },
      { text: 'Examples', link: '/markdown-examples' }
    ],

    sidebar: [
      {
        text: 'Examples',
        items: [
          { text: 'Markdown Examples', link: '/markdown-examples' },
          { text: 'Runtime API Examples', link: '/api-examples' }
        ]
      }
    ],

    socialLinks: [
      { icon: 'github', link: 'https://github.com/vuejs/vitepress' }
      { icon: 'github', link: 'https://github.com/EdwardChtholly' } //需要跳转的地址
    ]
  }
})
TIP
翻阅vitepress源代码,目前vitepress当前版本支持直接引用以下icon
type SocialLinkIcon =
  | 'discord'
  | 'facebook'
  | 'github'
  | 'instagram'
  | 'linkedin'
  | 'mastodon'
  | 'npm'
  | 'slack'
  | 'twitter'
  | 'x'
  | 'youtube'
  | { svg: string }
若需要其他自定义图标,使用以下方式引用:
    socialLinks: [
      {
        icon: {
          svg:'<svg t="1728197315150" class="icon" viewBox="0 0 1129 1024" version="1.1" xmlns="http://www.w3.org/2000/svg" p-id="4269" width="200" height="200"><path d="M234.909 9.656a80.468 80.468 0 0 1 68.398 0 167.374 167.374 0 0 1 41.843 30.578l160.937 140.82h115.07l160.936-140.82a168.983 168.983 0 0 1 41.843-30.578A80.468 80.468 0 0 1 930.96 76.445a80.468 80.468 0 0 1-17.703 53.914 449.818 449.818 0 0 1-35.406 32.187 232.553 232.553 0 0 1-22.531 18.508h100.585a170.593 170.593 0 0 1 118.289 53.109 171.397 171.397 0 0 1 53.914 118.288v462.693a325.897 325.897 0 0 1-4.024 70.007 178.64 178.64 0 0 1-80.468 112.656 173.007 173.007 0 0 1-92.539 25.75h-738.7a341.186 341.186 0 0 1-72.421-4.024A177.835 177.835 0 0 1 28.91 939.065a172.202 172.202 0 0 1-27.36-92.539V388.662a360.498 360.498 0 0 1 0-66.789A177.03 177.03 0 0 1 162.487 178.64h105.414c-16.899-12.07-31.383-26.555-46.672-39.43a80.468 80.468 0 0 1-25.75-65.984 80.468 80.468 0 0 1 39.43-63.57M216.4 321.873a80.468 80.468 0 0 0-63.57 57.937 108.632 108.632 0 0 0 0 30.578v380.615a80.468 80.468 0 0 0 55.523 80.469 106.218 106.218 0 0 0 34.601 5.632h654.208a80.468 80.468 0 0 0 76.444-47.476 112.656 112.656 0 0 0 8.047-53.109v-354.06a135.187 135.187 0 0 0 0-38.625 80.468 80.468 0 0 0-52.304-54.719 129.554 129.554 0 0 0-49.89-7.242H254.22a268.764 268.764 0 0 0-37.82 0z m0 0" fill="#20B0E3" p-id="4270"></path><path d="M348.369 447.404a80.468 80.468 0 0 1 55.523 18.507 80.468 80.468 0 0 1 28.164 59.547v80.468a80.468 80.468 0 0 1-16.094 51.5 80.468 80.468 0 0 1-131.968-9.656 104.609 104.609 0 0 1-10.46-54.719v-80.468a80.468 80.468 0 0 1 70.007-67.593z m416.02 0a80.468 80.468 0 0 1 86.102 75.64v80.468a94.148 94.148 0 0 1-12.07 53.11 80.468 80.468 0 0 1-132.773 0 95.757 95.757 0 0 1-12.875-57.133V519.02a80.468 80.468 0 0 1 70.007-70.812z m0 0" fill="#20B0E3" p-id="4271"></path></svg>'
      },
        link: 'https://space.bilibili.com/37483985'
      }
],其中svg中引用的内容为svg代码,在阿里巴巴矢量图标库https://www.iconfont.cn/下载时可以直接复制
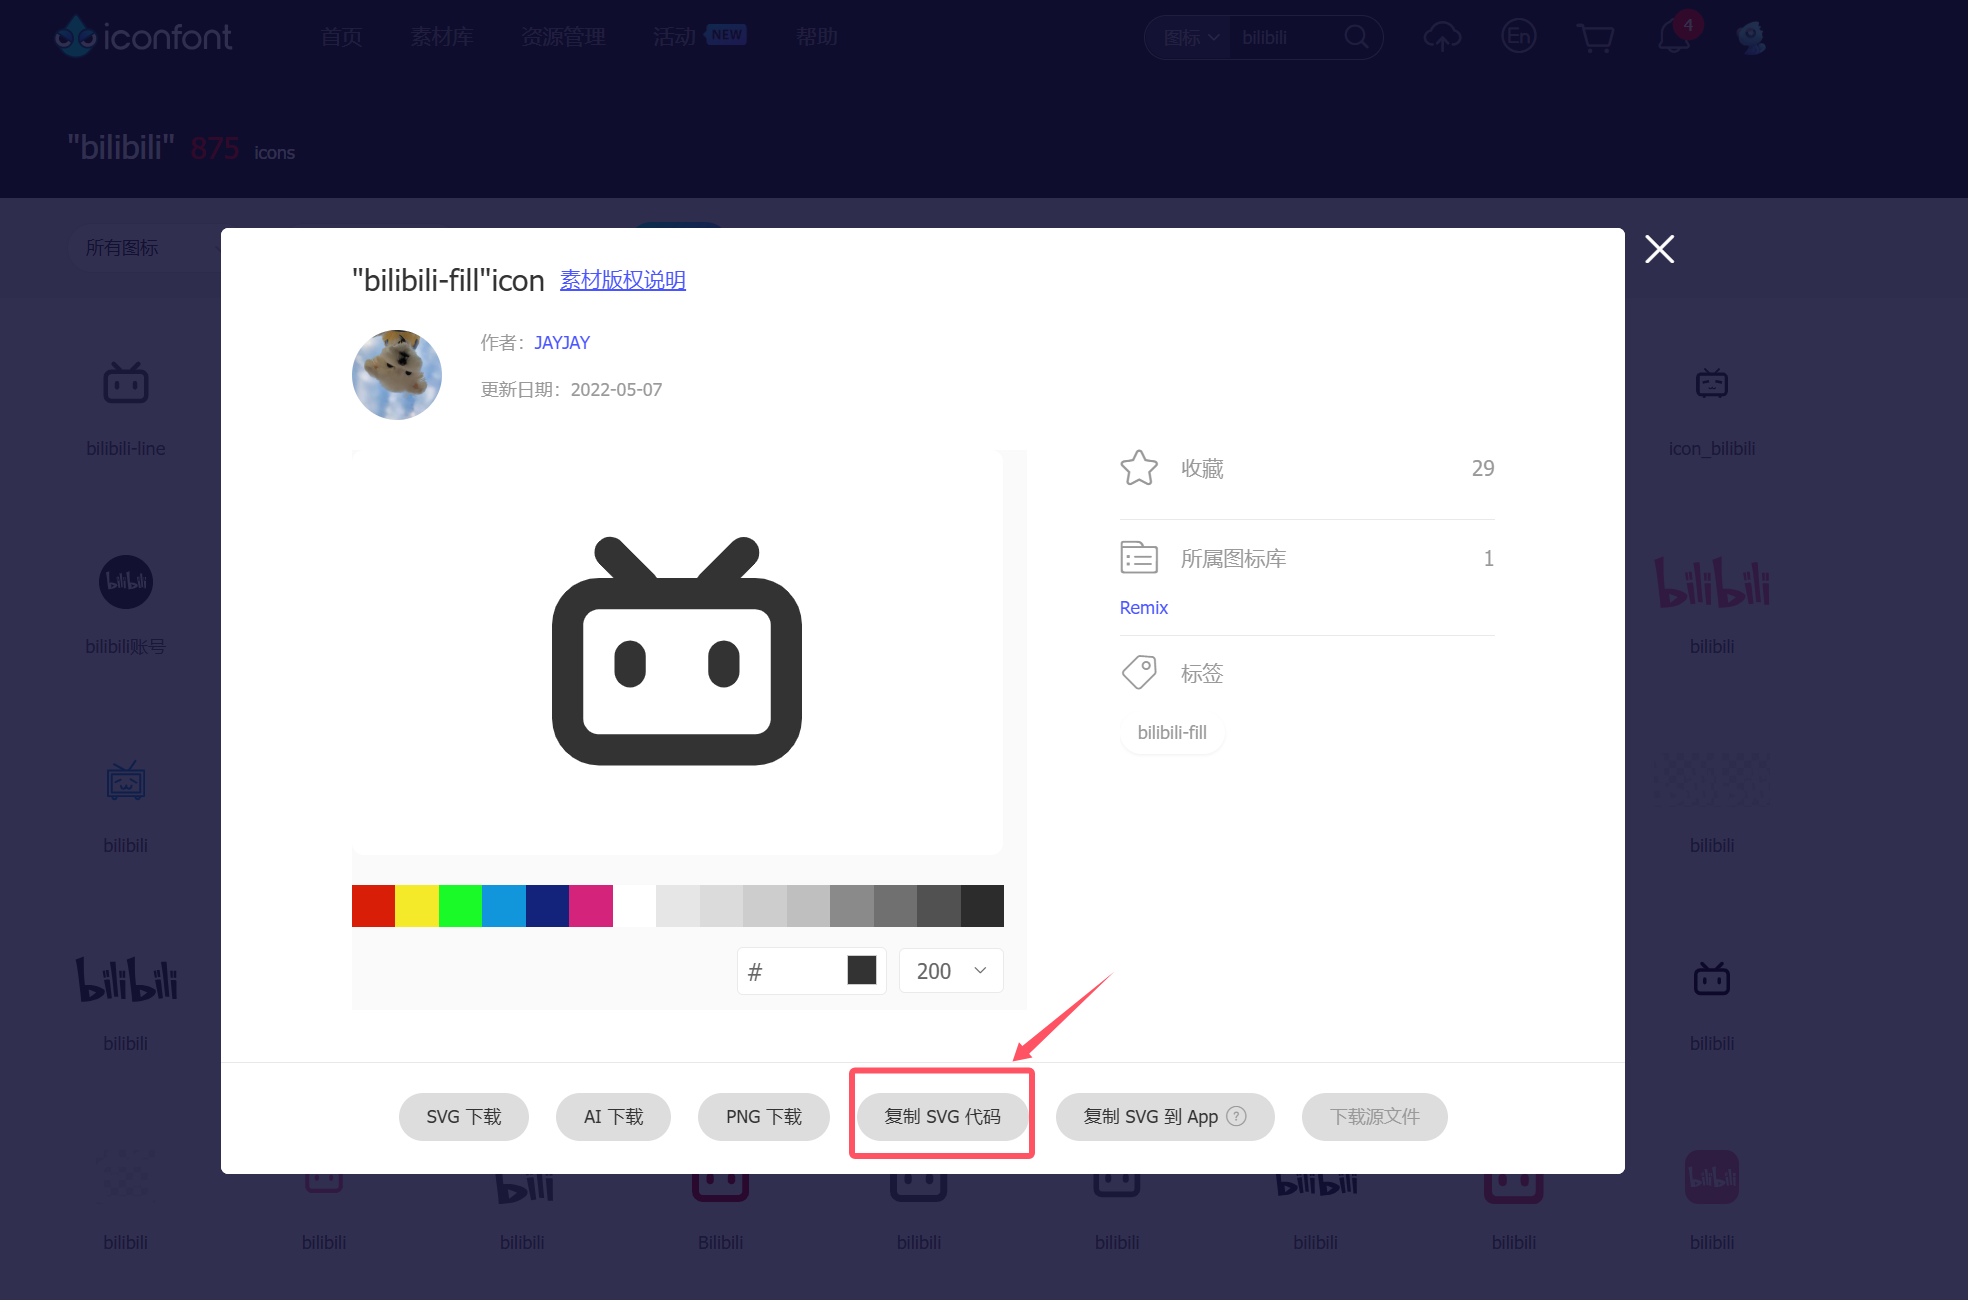
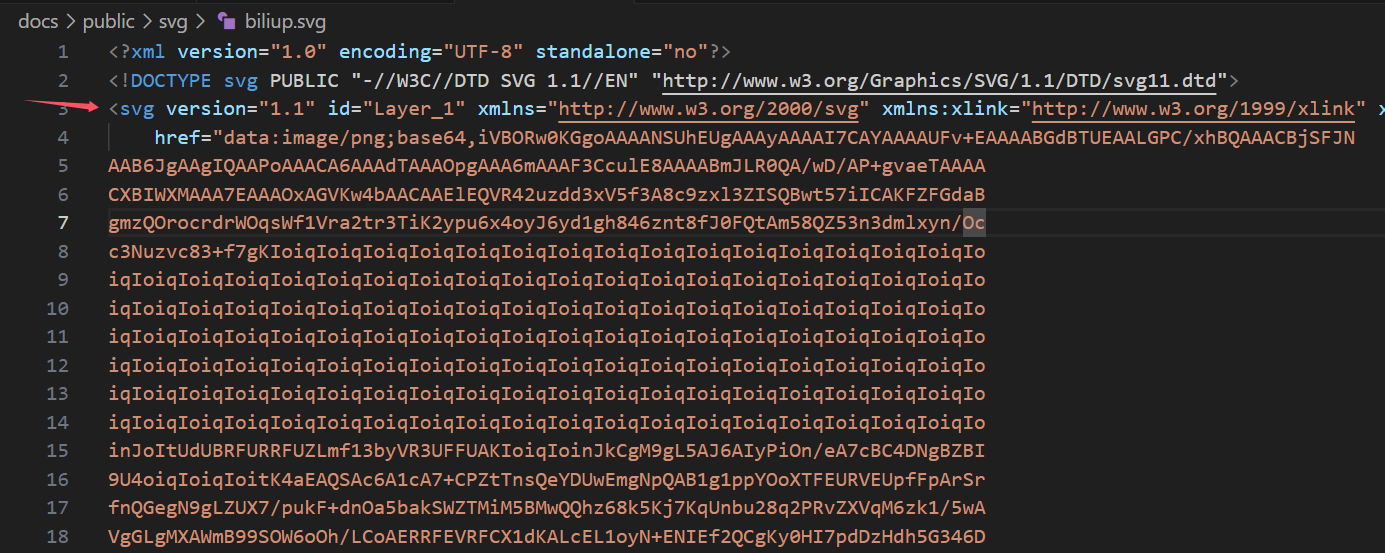
非矢量图标库下载的svg图标,可以在vscode中打开,复制 <svg>***</svg> 代码
效果:
- 地址栏图标
在 config.mjs defineConfig 下面直接配置即可
head: ["link", { rel: "icon", href: "/svg/kdl.svg" }],❗如果需要配置路径 base ,这个 href 也需要添加base路径作为前缀
2. nav和sidebar列表
nav为md页面左侧列表,sidebar为顶部socialLinks左侧页签
对于新手来说,这两个保持一致就行了,后期页面丰富了再自行调整
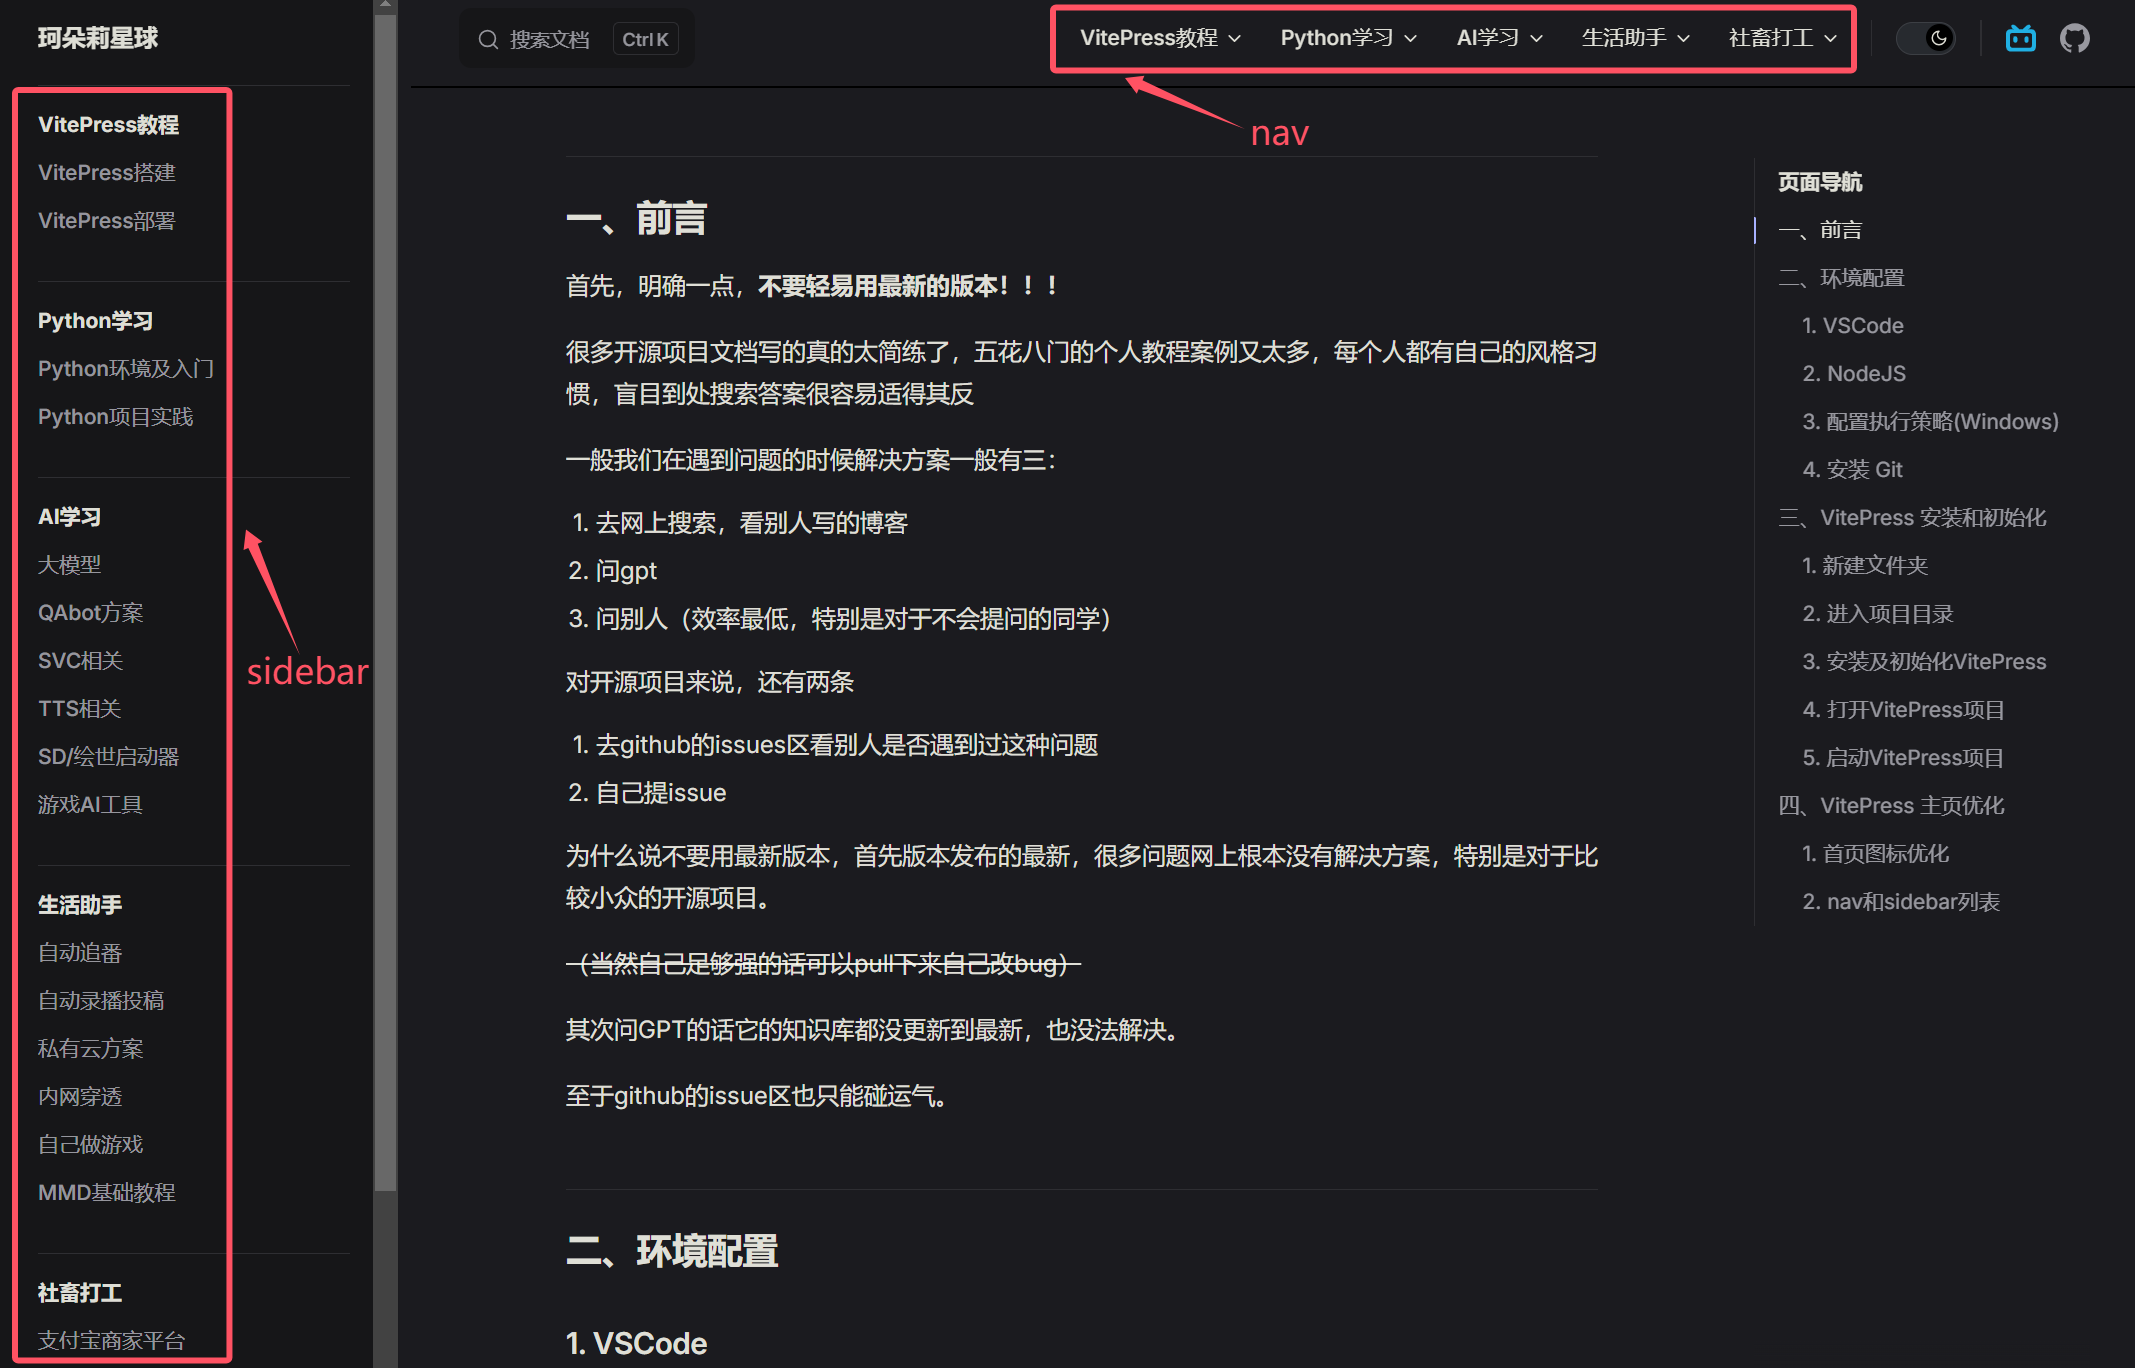
提供一个我用的样式:
    nav: [
      { text: 'VitePress教程',
        items: [
          { text: 'VitePress搭建', link: '/VitePress/VitePress搭建' },
          { text: 'VitePress部署', link: '/VitePress/VitePress部署' },
        ],
      },
      { text: 'Python学习',
        items: [
          { text: 'Python环境及入门', link: '/Python/Python环境及入门' },
          { text: 'Python项目实践', link: '/Python/Python项目实践' },
        ],
      },
      { text: 'AI学习',
        items: [
          { text: '大模型', link: '/AI/大模型' },
          { text: 'QAbot方案', link: '/AI/QAbot方案' },
          { text: 'SVC相关', link: '/AI/SVC相关' },
          { text: 'TTS相关', link: '/AI/TTS相关' },
          { text: 'SD/绘世启动器', link: '/AI/SD' },
          { text: '游戏AI工具', link: '/AI/游戏AI工具' }
        ],
      },
      { text: '生活助手',
        items: [
          { text: '自动追番', link: '/Others/自动追番' },
          { text: '自动录播投稿', link: '/Others/自动录播投稿' },
          { text: '私有云方案', link: '/Others/私有云方案' },
          { text: '内网穿透', link: '/Others/内网穿透' },
          { text: '自己做游戏', link: '/Others/自己做游戏' },
          { text: 'MMD基础教程', link: '/Others/MMD基础教程' }
        ],
      },
      { text: '社畜打工',
        items: [
          { text: '支付宝商家平台', link: '/Work/支付宝商家平台' },
          { text: '微信商家平台', link: '/Work/微信商家平台' }
        ],
      },
    ]
TIP
items中的link内容,与静态资源不同,需在 /docs/ 下创建对应的md文件夹,将资源统一归集其中
文件夹命名的大小写需要特别注意,对应浏览的文件无需加上 .md 后缀。当然你要加我也不拦你
3. features列表
回到 docs/index.md 文件,修改以下features代码:
---
# https://vitepress.dev/reference/default-theme-home-page
layout: home

hero:
  name: "珂朵莉星球"
  text: "爱德华の珂朵莉星球,解决方案的收集中心"
  tagline: 没有技术解决不了的问题,如果有,那就解决提出的人
  image:
    src: /svg/kdl.svg
    alt: 背景图
  actions:
    - theme: brand
      text: Markdown Examples
      link: /markdown-examples
    - theme: alt
      text: API Examples
      link: /api-examples

features:
  - icon:
      src: /svg/alist.svg
    title: Alist
    details: 一个支持多种存储的文件列表程序,使用 Gin 和 Solidjs。
    link: https://alist.nn.ci/zh/
  - icon:
      src: /svg/light-logo.svg
    title: AutoBangumi
    details: 自动追番,解放双手!从 RSS 全自动 订阅解析、下载管理、重命名整理。
    link: https://www.autobangumi.org/
  - icon:
      src: /svg/biliup.svg
    title: Biliup
    details: 一套直播录制、视频下载和上传的工具, 提供了多种方式 自动化的完成录制上传。
    link: https://biliup.github.io/biliup/
---
TIP
icon 的 src 引用,需遵循前面提到的 public 文件夹原则
效果:

4. name、text等描述修改
name、text、tagline在 docs/index.md 文件修改
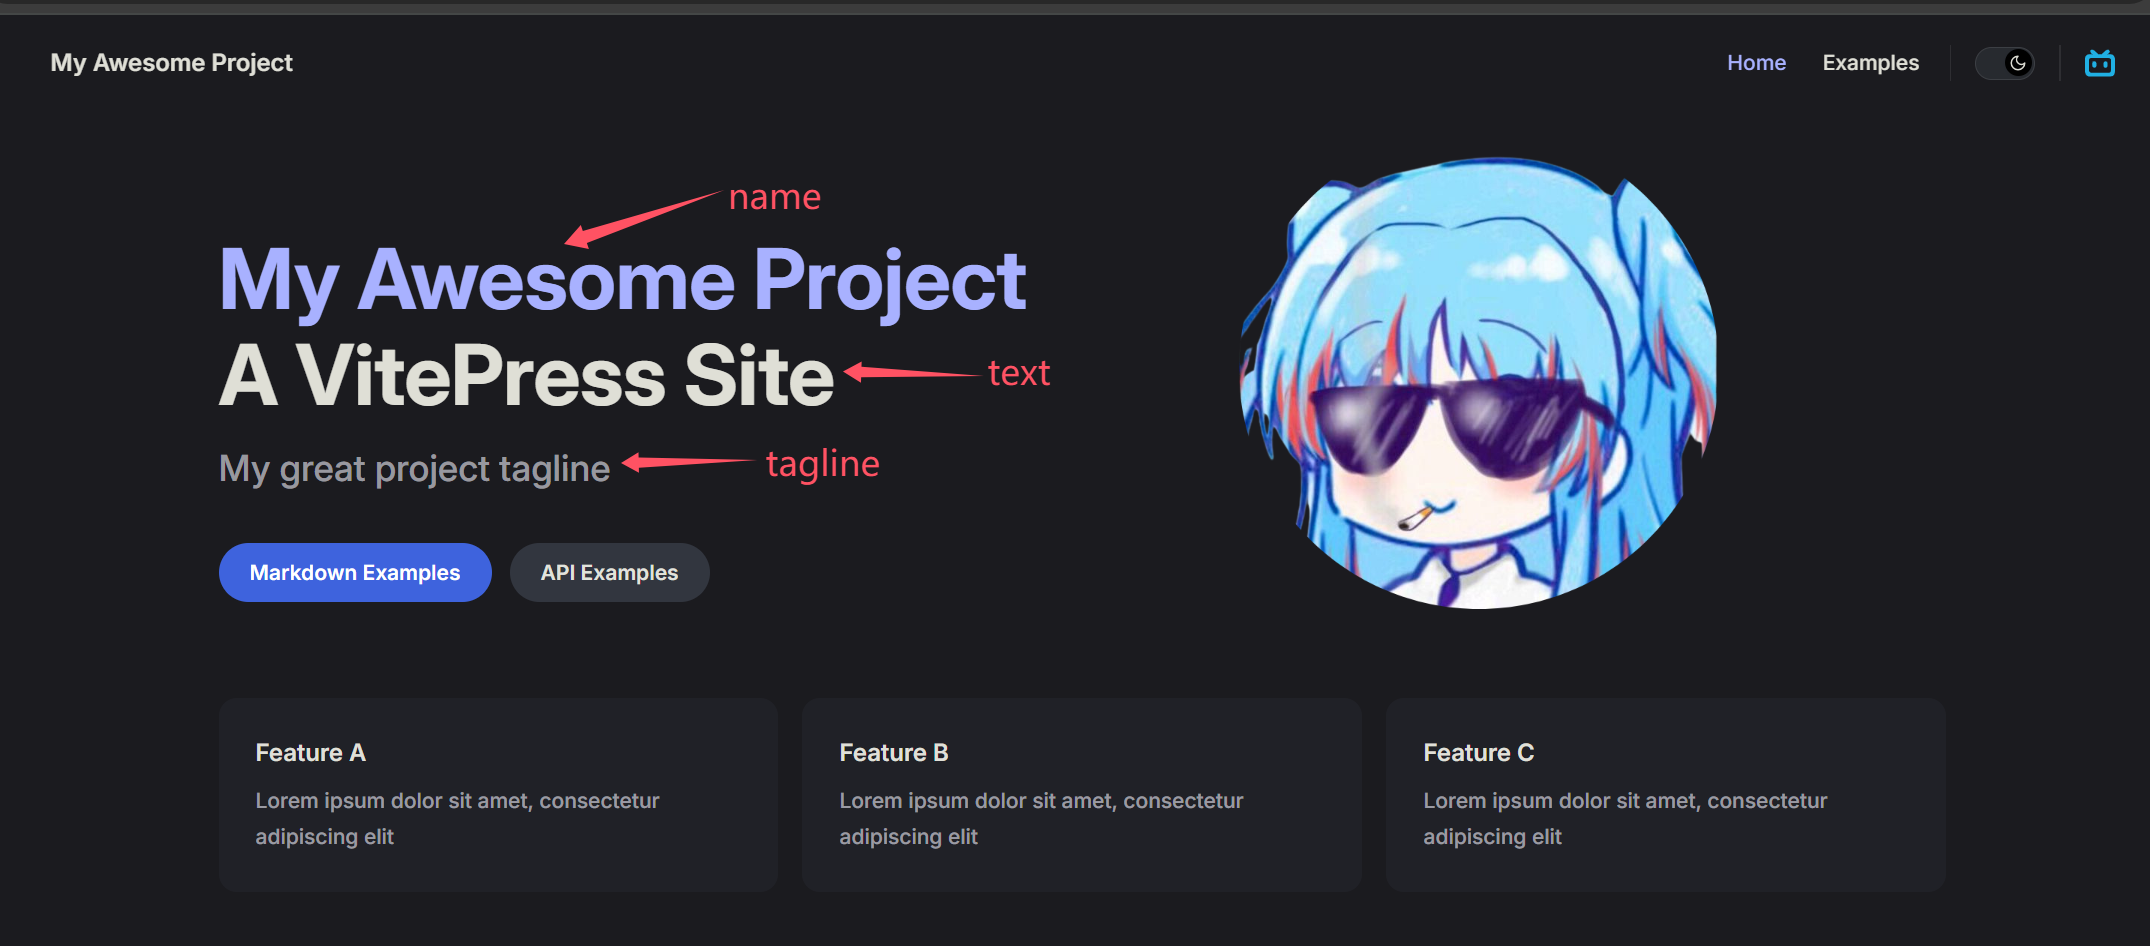
---
# https://vitepress.dev/reference/default-theme-home-page
layout: home
hero:
name: "珂朵莉星球"
text: "爱德华の珂朵莉星球,解决方案的收集中心"
tagline: 没有技术解决不了的问题,如果有,那就解决提出的人
image:
src: /svg/kdl.svg
alt: 背景图
actions:
- theme: brand
text: Markdown Examples
link: /markdown-examples
- theme: alt
text: API Examples
link: /api-examples
features:
- title: Feature A
details: Lorem ipsum dolor sit amet, consectetur adipiscing elit
- title: Feature B
details: Lorem ipsum dolor sit amet, consectetur adipiscing elit
- title: Feature C
details: Lorem ipsum dolor sit amet, consectetur adipiscing elit
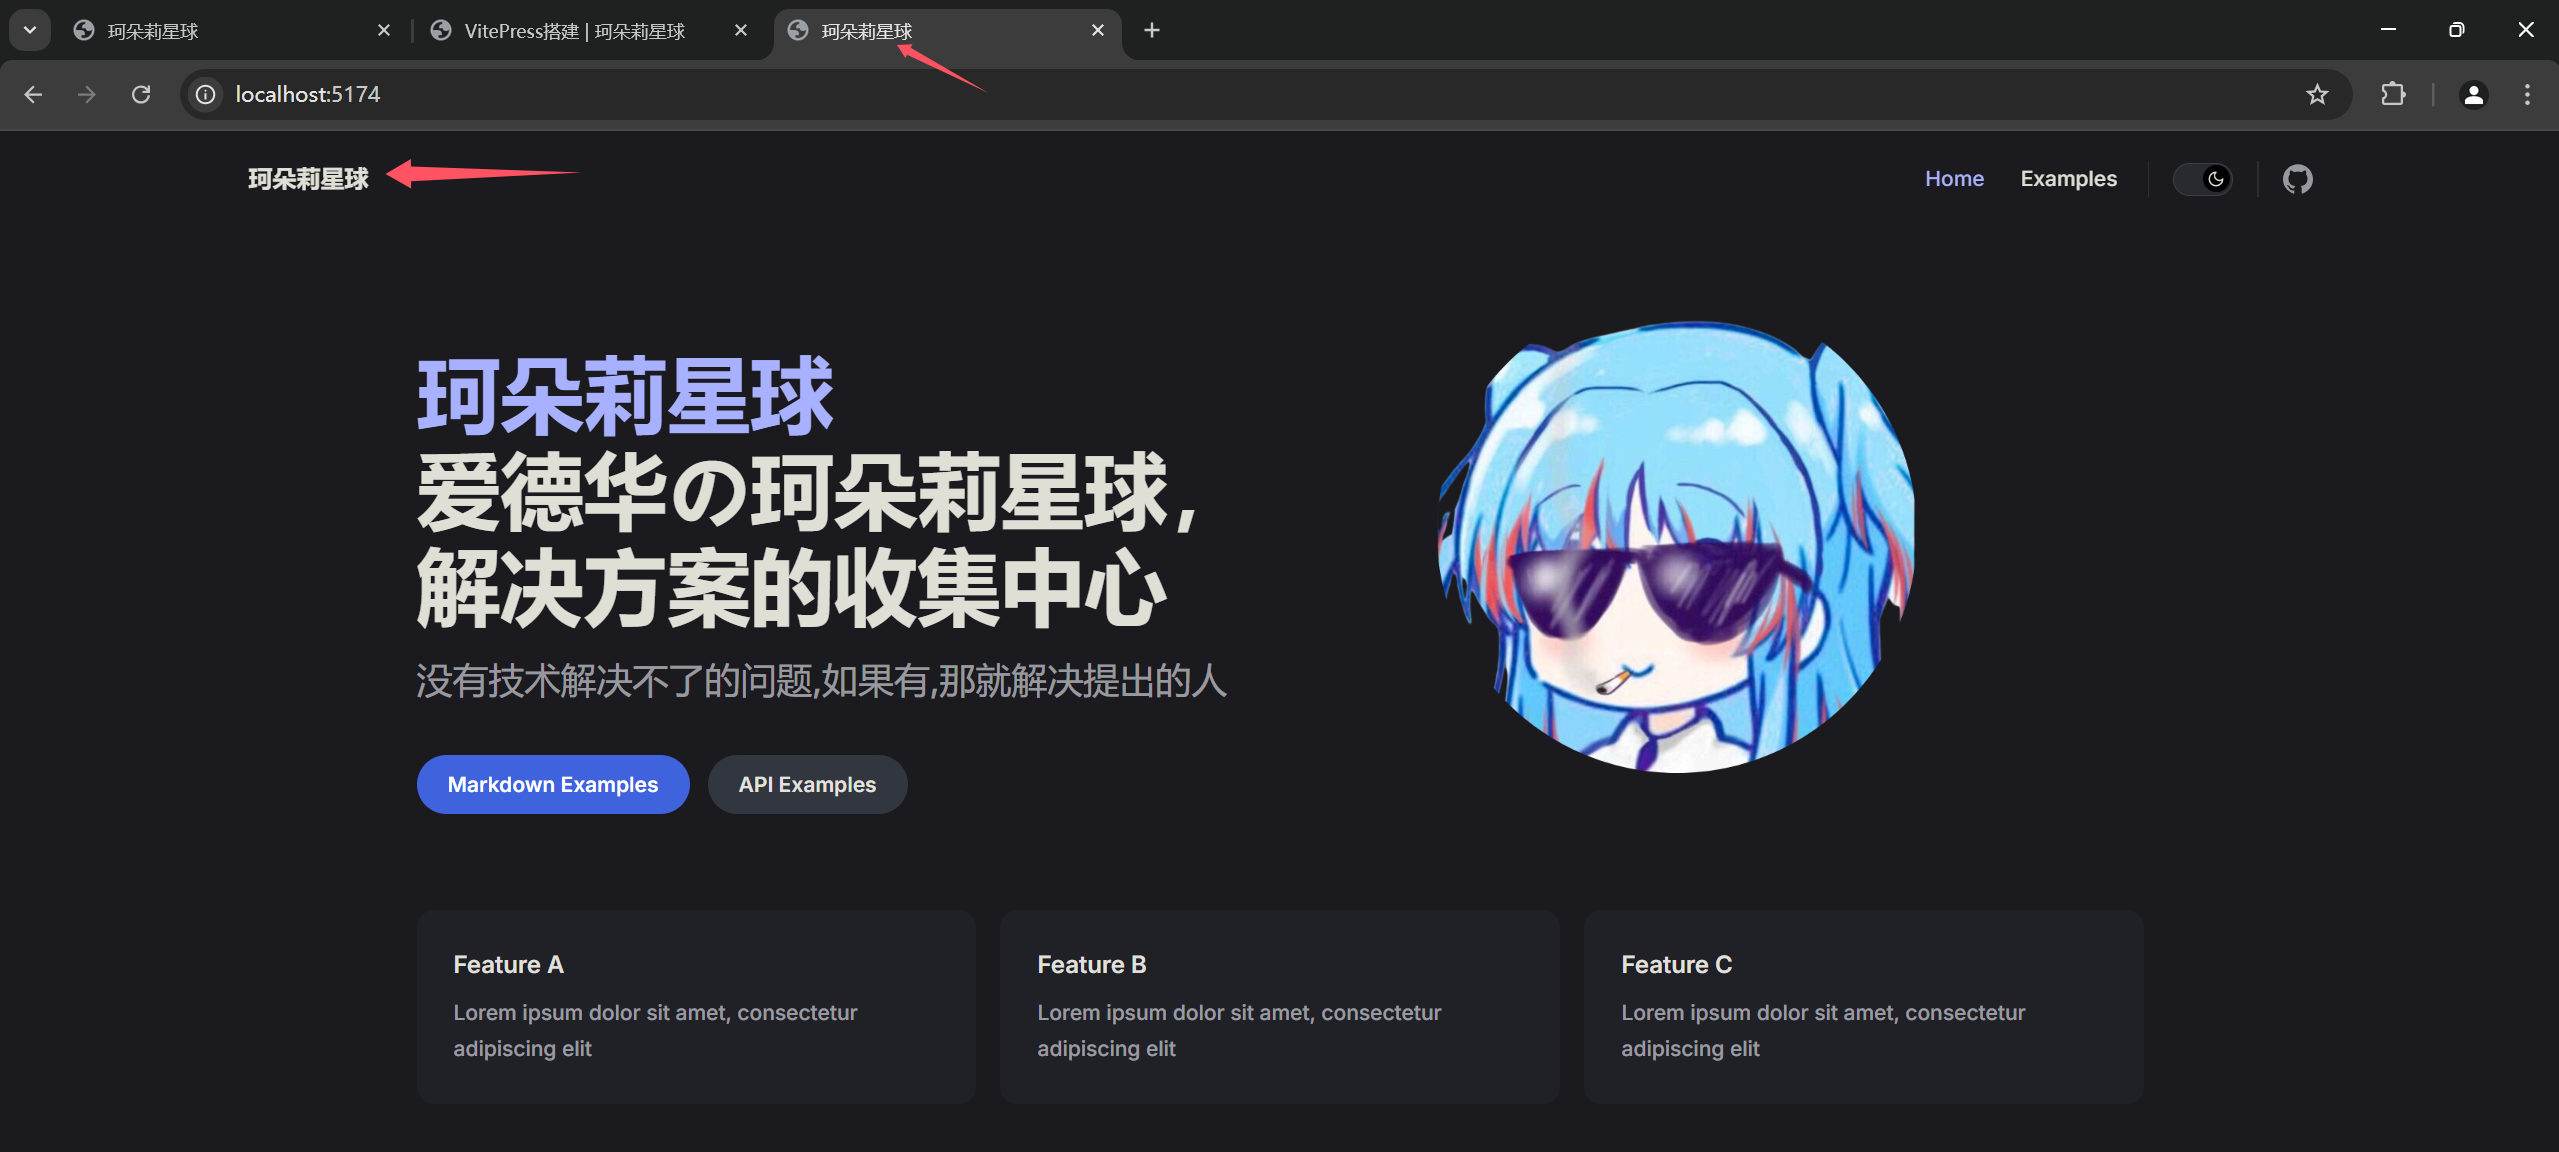
---title在 docs/config.mjs 文件修改
import { defineConfig } from 'vitepress'

// https://vitepress.dev/reference/site-config
export default defineConfig({
  title: "珂朵莉星球",
  description: "爱德华の珂朵莉星球",
  themeConfig: {
    // https://vitepress.dev/reference/default-theme-config
    nav: [
      { text: 'Home', link: '/' },
      { text: 'Examples', link: '/markdown-examples' }
    ],

    sidebar: [
      {
        text: 'Examples',
        items: [
          { text: 'Markdown Examples', link: '/markdown-examples' },
          { text: 'Runtime API Examples', link: '/api-examples' }
        ]
      }
    ],

    socialLinks: [
      { icon: 'github', link: 'https://github.com/EdwardChtholly' }
    ]
  }
})
效果:
5. config.mjs高级优化
- 图片点击放大预览
在非TS模式下,使用 markdown-it-custom-attrs 插件实现放大预览
Step. 1: 安装依赖
PS C:\Users\Administrator> pnpm i markdown-it-custom-attrsStep. 2: 引入插件
import { defineConfig } from 'vitepress'
import mdItCustomAttrs from 'markdown-it-custom-attrs'

// https://vitepress.dev/reference/site-config
export default defineConfig({
  title: "珂朵莉星球",
  description: "爱德华の珂朵莉星球",
  markdown: {
    config: (md) => {
      // use more markdown-it plugins!
      md.use(mdItCustomAttrs, "image", {
        "data-fancybox": "gallery",
      });
    },
  },
  head: [
    [
      "link",
      {
        rel: "stylesheet",
        href: "https://cdn.jsdelivr.net/npm/@fancyapps/ui/dist/fancybox.css",
      },
    ],
    [
      "script",
      {
        src: "https://cdn.jsdelivr.net/npm/@fancyapps/ui@4.0/dist/fancybox.umd.js",
      },
    ],
  ],
  themeConfig: {
    // https://vitepress.dev/reference/default-theme-config
    nav: [
      { text: 'Home', link: '/' },
      { text: 'Examples', link: '/markdown-examples' }
    ],

    sidebar: [
      {
        text: 'Examples',
        items: [
          { text: 'Markdown Examples', link: '/markdown-examples' },
          { text: 'Runtime API Examples', link: '/api-examples' }
        ]
      }
    ],

    socialLinks: [
      { icon: 'github', link: 'https://github.com/EdwardChtholly' }
    ]
  }
})
Step. 3: 渲染效果
在md中,图片代码后加上 {data-fancybox=gallery}
示例: {data-fancybox=gallery}
- 页面搜索及其他优化
import { defineConfig } from 'vitepress'
import mdItCustomAttrs from 'markdown-it-custom-attrs'
// https://vitepress.dev/reference/site-config
export default defineConfig({
title: "珂朵莉星球",
description: "爱德华の珂朵莉星球",
markdown: {
config: (md) => {
// use more markdown-it plugins!
md.use(mdItCustomAttrs, "image", {
"data-fancybox": "gallery",
});
},
},
head: [
[
"link",
{
rel: "stylesheet",
href: "https://cdn.jsdelivr.net/npm/@fancyapps/ui/dist/fancybox.css",
},
],
[
"script",
{
src: "https://cdn.jsdelivr.net/npm/@fancyapps/ui@4.0/dist/fancybox.umd.js",
},
],
],
themeConfig: {
// https://vitepress.dev/reference/default-theme-config
nav: [
{ text: 'Home', link: '/' },
{ text: 'Examples', link: '/markdown-examples' }
],
sidebar: [
{
text: 'Examples',
items: [
{ text: 'Markdown Examples', link: '/markdown-examples' },
{ text: 'Runtime API Examples', link: '/api-examples' }
]
}
],
socialLinks: [
{ icon: 'github', link: 'https://github.com/EdwardChtholly' }
],
docFooter: {
prev: "上一页",
next: "下一页",
},
TIP
关于 VitePress 配置了看不到最后更新时间
你必须使用 git commit 提交 markdown 文件才能看到最后更新时间。
相关文档:https://vitepress.dev/zh/reference/default-theme-last-updated
会在下一章 vitepress部署 中再详细说明